Chapter 3: Building AI Agents: Tools & Functions
Learning Objectives
By the end of this chapter, you will be able to:
-
Explain the agent paradigm, including the agent execution loop and the decision of when an agent architecture is warranted over a standard chat completion.
-
Build an AI agent using the Foundry Agent Service, first in the Microsoft Foundry portal and then in VS Code with the SDK.
-
Define a custom function tool — including its name, description, and JSON parameter schema — and attach it to an agent.
-
Handle tool-call errors so that an agent fails explicitly rather than fabricating results.
3.1 Introduction: From Generating Text to Taking Action
So far in this course, you have worked with language models in a single mode: you send a prompt, and the model returns text. Whether you crafted system messages in Chapter 1 or built RAG pipelines and applied content safety in Chapter 2, the fundamental interaction was always the same — text in, text out. You also learned, in those chapters, how to measure output quality: model evaluation metrics in Chapter 1 and the evaluators and responsible-AI safety layers in Chapter 2.
This chapter introduces a fundamentally different paradigm. Instead of only generating text, you will build systems that take actions in the world — looking up live data, calling APIs, and running custom functions. These systems are called AI agents, and they are the foundation of the next three chapters of this course.
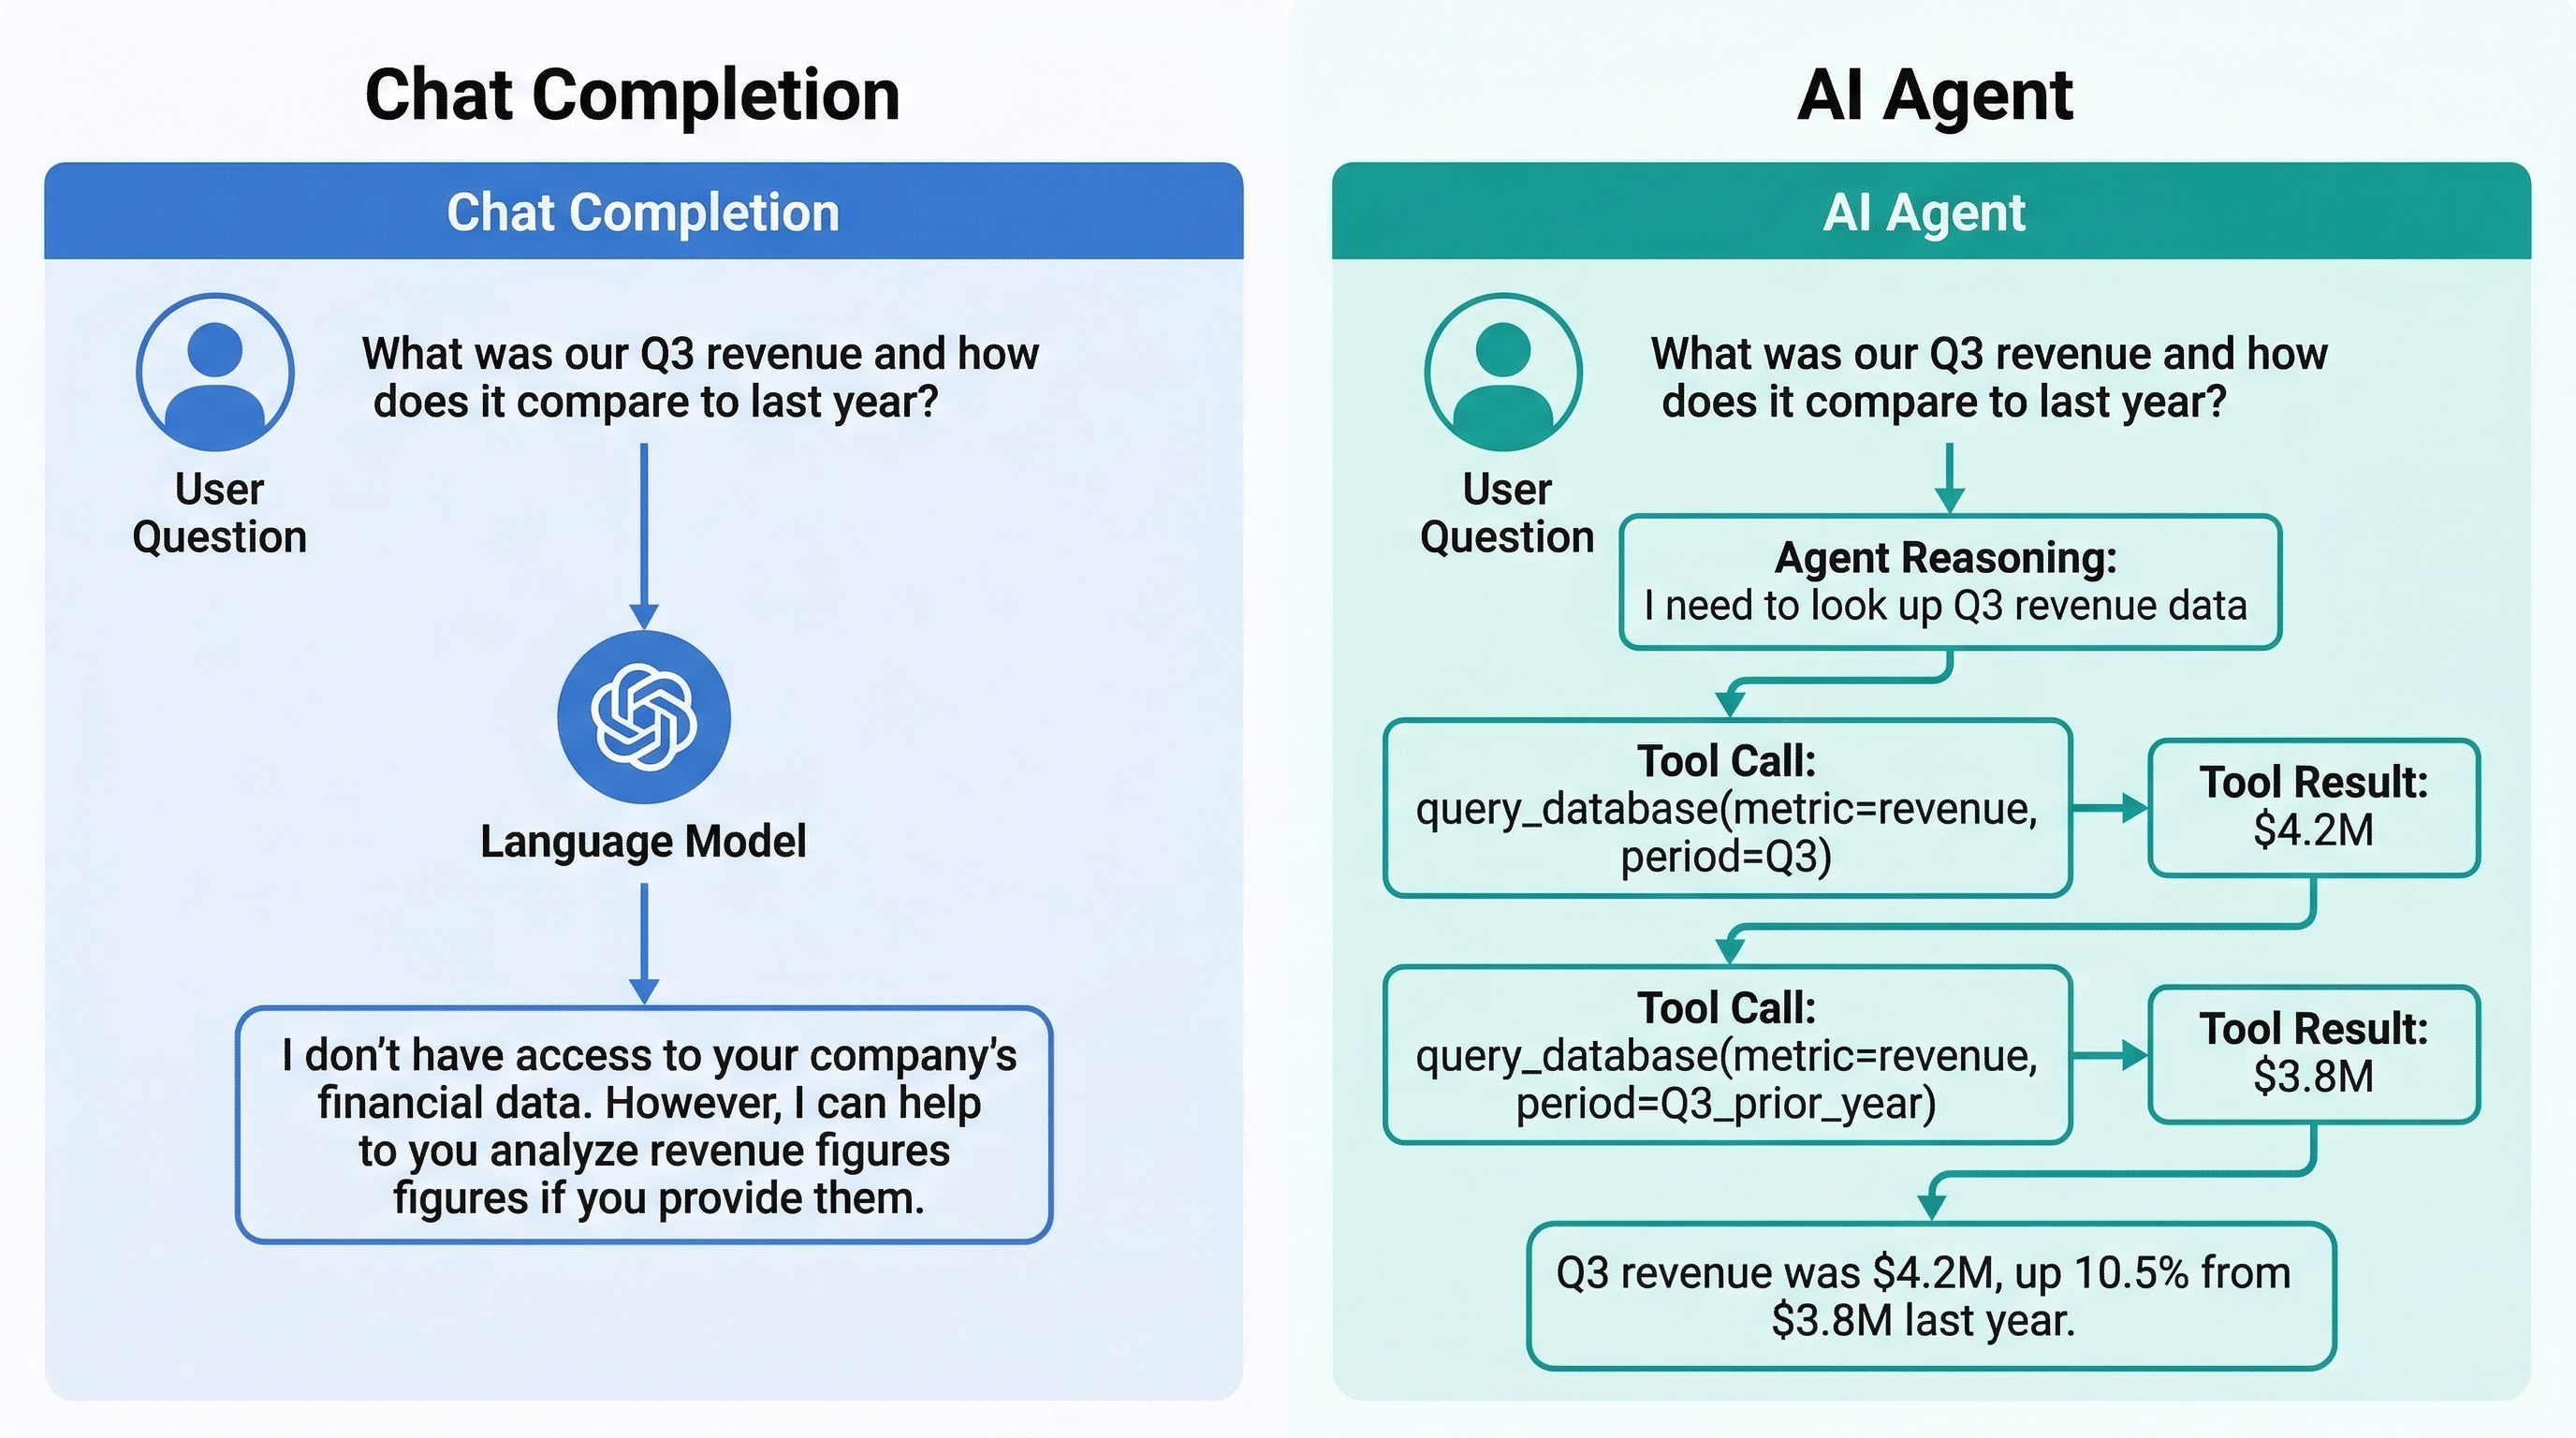
Consider a user who asks a customer support assistant, "Cancel my subscription and send me a confirmation email." A standard chat completion model can generate a response like, "I’d be happy to help you cancel your subscription. Here’s what you need to do…" — but it cannot actually cancel the subscription or send the email. It can describe an action but cannot perform it. An agent closes that gap: it can call a cancel_subscription function that interacts with the billing system, then a send_email function, and finally report what it actually did.
This is the first chapter of a three-chapter agent arc. In this chapter, you will learn the agent paradigm and build agents with the Foundry Agent Service, attaching custom function tools so your agent can take action. In Chapter 4, you will extend agents with external knowledge and protocols (the Model Context Protocol and Foundry IQ). In Chapter 5, you will move to agent frameworks and multi-agent orchestration.
|
Where did evaluation go? In earlier drafts of this course, model and output evaluation lived here. That material now appears earlier, where it belongs: model evaluation in Chapter 1, and evaluators and responsible-AI safety layers in Chapter 2, Section 2.4.8. When you build agents in this chapter, remember that those same evaluation disciplines apply to an agent’s final response. |
Here is the roadmap for this chapter. In Section 3.2, you will learn what makes an agent different from chat completion and how the agent execution loop works. In Section 3.3, you will learn the decision framework for choosing between an agent and standard chat completion. In Section 3.4, you will build an agent with the Foundry Agent Service — first in the portal, then in VS Code with the SDK (Lab 6). In Section 3.5, you will learn the anatomy of a tool definition and the tool-call lifecycle, then define a custom function tool and attach it to an agent (Lab 7). Section 3.6 covers error handling for tool calls. Finally, Sections 3.7 and 3.8 prepare you for this week’s labs and assessments.
3.2 The Agent Paradigm
3.2.1 The Limitation of Standard Chat Completion: Text In, Text Out
Standard chat completion is the interaction pattern you have used since Chapter 1. You send a sequence of messages (system message, user message, optionally assistant messages for conversation history), and the model returns a text response. The model’s entire capability is constrained to generating the next sequence of tokens based on its input.
This pattern is powerful for many tasks: answering questions, summarizing documents, translating text, writing content, and explaining concepts. But it has a fundamental limitation: the model cannot interact with the outside world. It cannot look up current information, query a database, send an email, create a calendar event, or execute code. It can only generate text that describes these actions.
3.2.2 What Makes an Agent Different: The Ability to Take Actions Through Tool Calling
An AI agent is a system built on top of a language model that can take actions in the world through tool calling (also called function calling). Instead of only generating text, the model can decide that a situation requires an action — looking up data in a database, calling an API, running a calculation — and invoke a predefined tool to perform that action. The model then receives the result of the tool call and incorporates it into its reasoning before generating the next response.
The key distinction is that an agent does not just describe what should happen — it makes it happen. When the user says "Cancel my subscription," an agent can call a cancel_subscription tool that actually interacts with the billing system, then call a send_email tool to send the confirmation, and finally generate a text response confirming what was done.
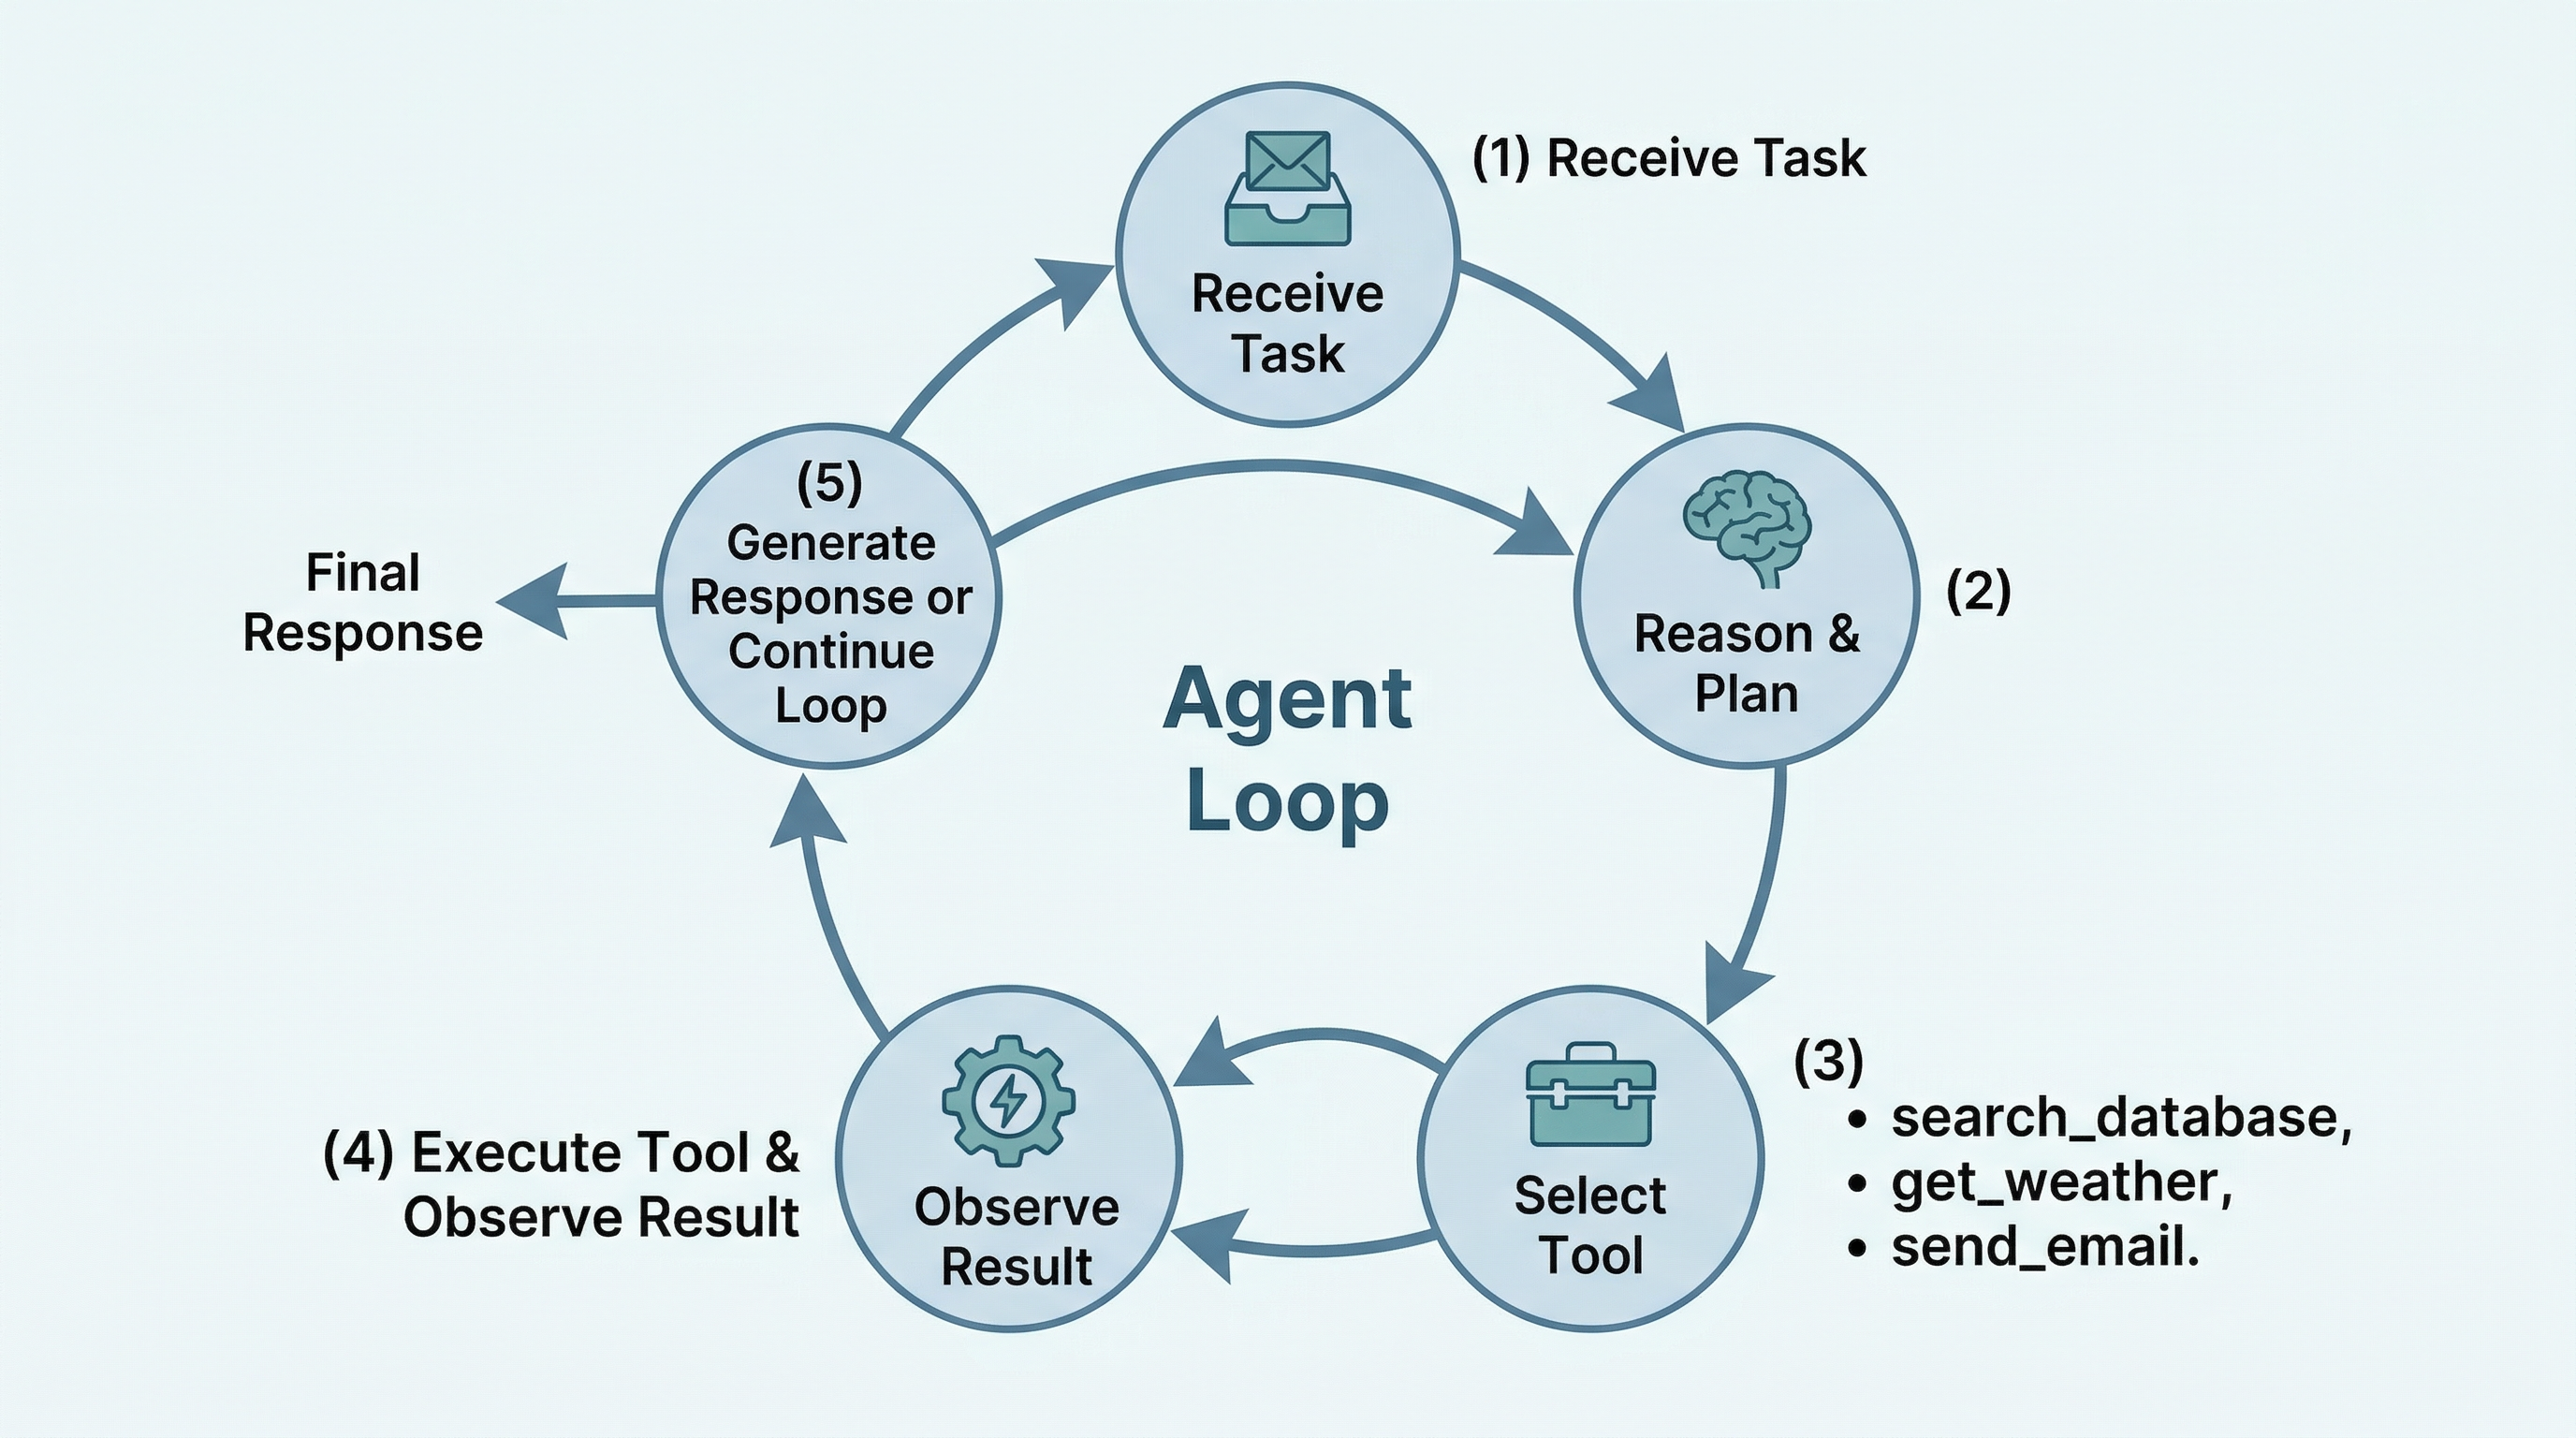
3.2.3 The Agent Execution Loop: Receive Task, Reason, Select Tool, Execute, Observe, Repeat
Agents operate through an iterative execution loop that distinguishes them from one-shot text generation:
-
Receive task. The agent receives a user request or an assigned task.
-
Reason. The language model analyzes the task, considers the available tools, and determines what action to take next. This reasoning step is where the model’s intelligence is applied — it must understand the task, break it into steps if necessary, and decide which tool (if any) is appropriate.
-
Select tool. The model chooses a specific tool from its available set and formulates the parameters for that tool call. For example, it might select the
search_databasetool with the parameter{"query": "customer subscription status", "customer_id": "12345"}. -
Execute. The system executes the tool call and captures the result. This step happens outside the model — the tool interacts with a real system (a database, an API, a file system) and returns data.
-
Observe. The model receives the tool’s output and incorporates it into its context. It now has new information that was not available when it started reasoning.
-
Repeat. The model determines whether the task is complete. If not, it returns to the reasoning step with the new information and may select another tool. This loop continues until the model determines that the task is fully addressed and generates a final text response.
This loop can execute multiple iterations for a single user request. A complex task like "Find the three most recent orders for customer 12345, check whether any are eligible for a refund, and process the refund for any eligible orders" might require the agent to call a get_orders tool, then a check_refund_eligibility tool for each order, then a process_refund tool for eligible orders — each iteration building on the results of the previous one.
3.2.4 Components of an Agent: Instructions, Tools, Thread, Execution Loop
An AI agent is composed of a few key components. In the Foundry Agent Service (which you will use in Section 3.4), these map directly to the objects you create:
Instructions. The agent’s instructions define its role, goal, capabilities, constraints, and behavioral guidelines — the agent equivalent of a system prompt. For an agent, instructions are typically more detailed than a plain chat system message because they must describe not just how to communicate but when and how to use tools. They might include guidance like "When a user asks to cancel a subscription, use the cancel_subscription tool rather than describing the cancellation process."
Tools. Each tool available to the agent is described in a structured format that includes the tool’s name, a description of what it does, and the parameters it accepts (with types and descriptions). The model uses these definitions to understand what each tool can do and how to call it correctly. You will examine the anatomy of a tool definition in detail in Section 3.5.
Thread. An agent runs over a conversation thread — the ordered sequence of messages, tool calls, and tool results that make up a single interaction. The thread is the agent’s short-term memory: each tool call and its result are added to the thread so the model can reference earlier steps as the loop iterates.
Execution loop. The loop described in Section 3.2.3 is the runtime engine that orchestrates the interaction between the model’s reasoning and the tool executions. With the Foundry Agent Service, the service manages much of this loop for you when you start a run over a thread, but it is essential to understand what is happening underneath.
|
An agent is not magic — it is a pattern built on top of a language model with tool calling enabled. The model never executes anything itself; it only proposes tool calls by returning structured data. The "agent" is the combination of instructions, registered tools, the thread that holds conversation state, and the execution loop that runs the propose-execute-observe cycle. The Foundry Agent Service packages these pieces into managed objects so you do not have to hand-build the loop, but the underlying mechanics are the same ones you will trace in Sections 3.4 and 3.5. |
3.3 When to Use Agents vs. Standard Chat Completion
Understanding the agent pattern is one thing; knowing when to apply it is another. Not every AI application needs an agent, and using an agent when standard chat completion would suffice adds unnecessary complexity.
3.3.1 Tasks Suited to Standard Chat Completion
Standard chat completion is the right choice when the task can be fully accomplished through text generation alone. These tasks share a common characteristic: the model has everything it needs in the prompt (or in its training data) and does not need to interact with external systems.
Examples include:
-
Content generation. Writing marketing copy, drafting emails, generating summaries of provided text. The model transforms input text into output text without needing external data.
-
Question answering with provided context. RAG-based question answering, where the relevant documents are already retrieved and included in the prompt. The model synthesizes an answer from the provided context.
-
Text transformation. Translation, reformatting, style adjustment, tone changes. The input contains everything the model needs.
-
Analysis and explanation. Explaining a concept, analyzing a piece of code, interpreting a data pattern described in the prompt. These are reasoning tasks that produce text output.
3.3.2 Tasks Suited to Agent Architectures
Agent architectures are warranted when the task requires the model to interact with external systems, access real-time data, or perform actions that go beyond text generation.
Examples include:
-
Multi-step workflows. "Check my order status, and if it’s been more than 7 days, file a support ticket." This requires querying an order database, evaluating the result, and conditionally calling a ticketing API.
-
Real-time data retrieval. "What’s the current price of this product?" requires calling an inventory or pricing API that returns live data the model was not trained on.
-
System actions. "Schedule a meeting with my team for next Tuesday at 2 PM" requires interacting with a calendar API to create an actual event.
-
Dynamic research. "Find all open issues assigned to me, summarize them, and draft a status update email" requires querying an issue tracker, synthesizing the results, and potentially drafting content based on live data.
3.3.3 The Decision Framework: Does the Task Require External Data or Actions Beyond Text Generation?
The fundamental question for deciding between standard chat completion and an agent architecture is: Does the task require the model to access external systems or take actions beyond generating text?
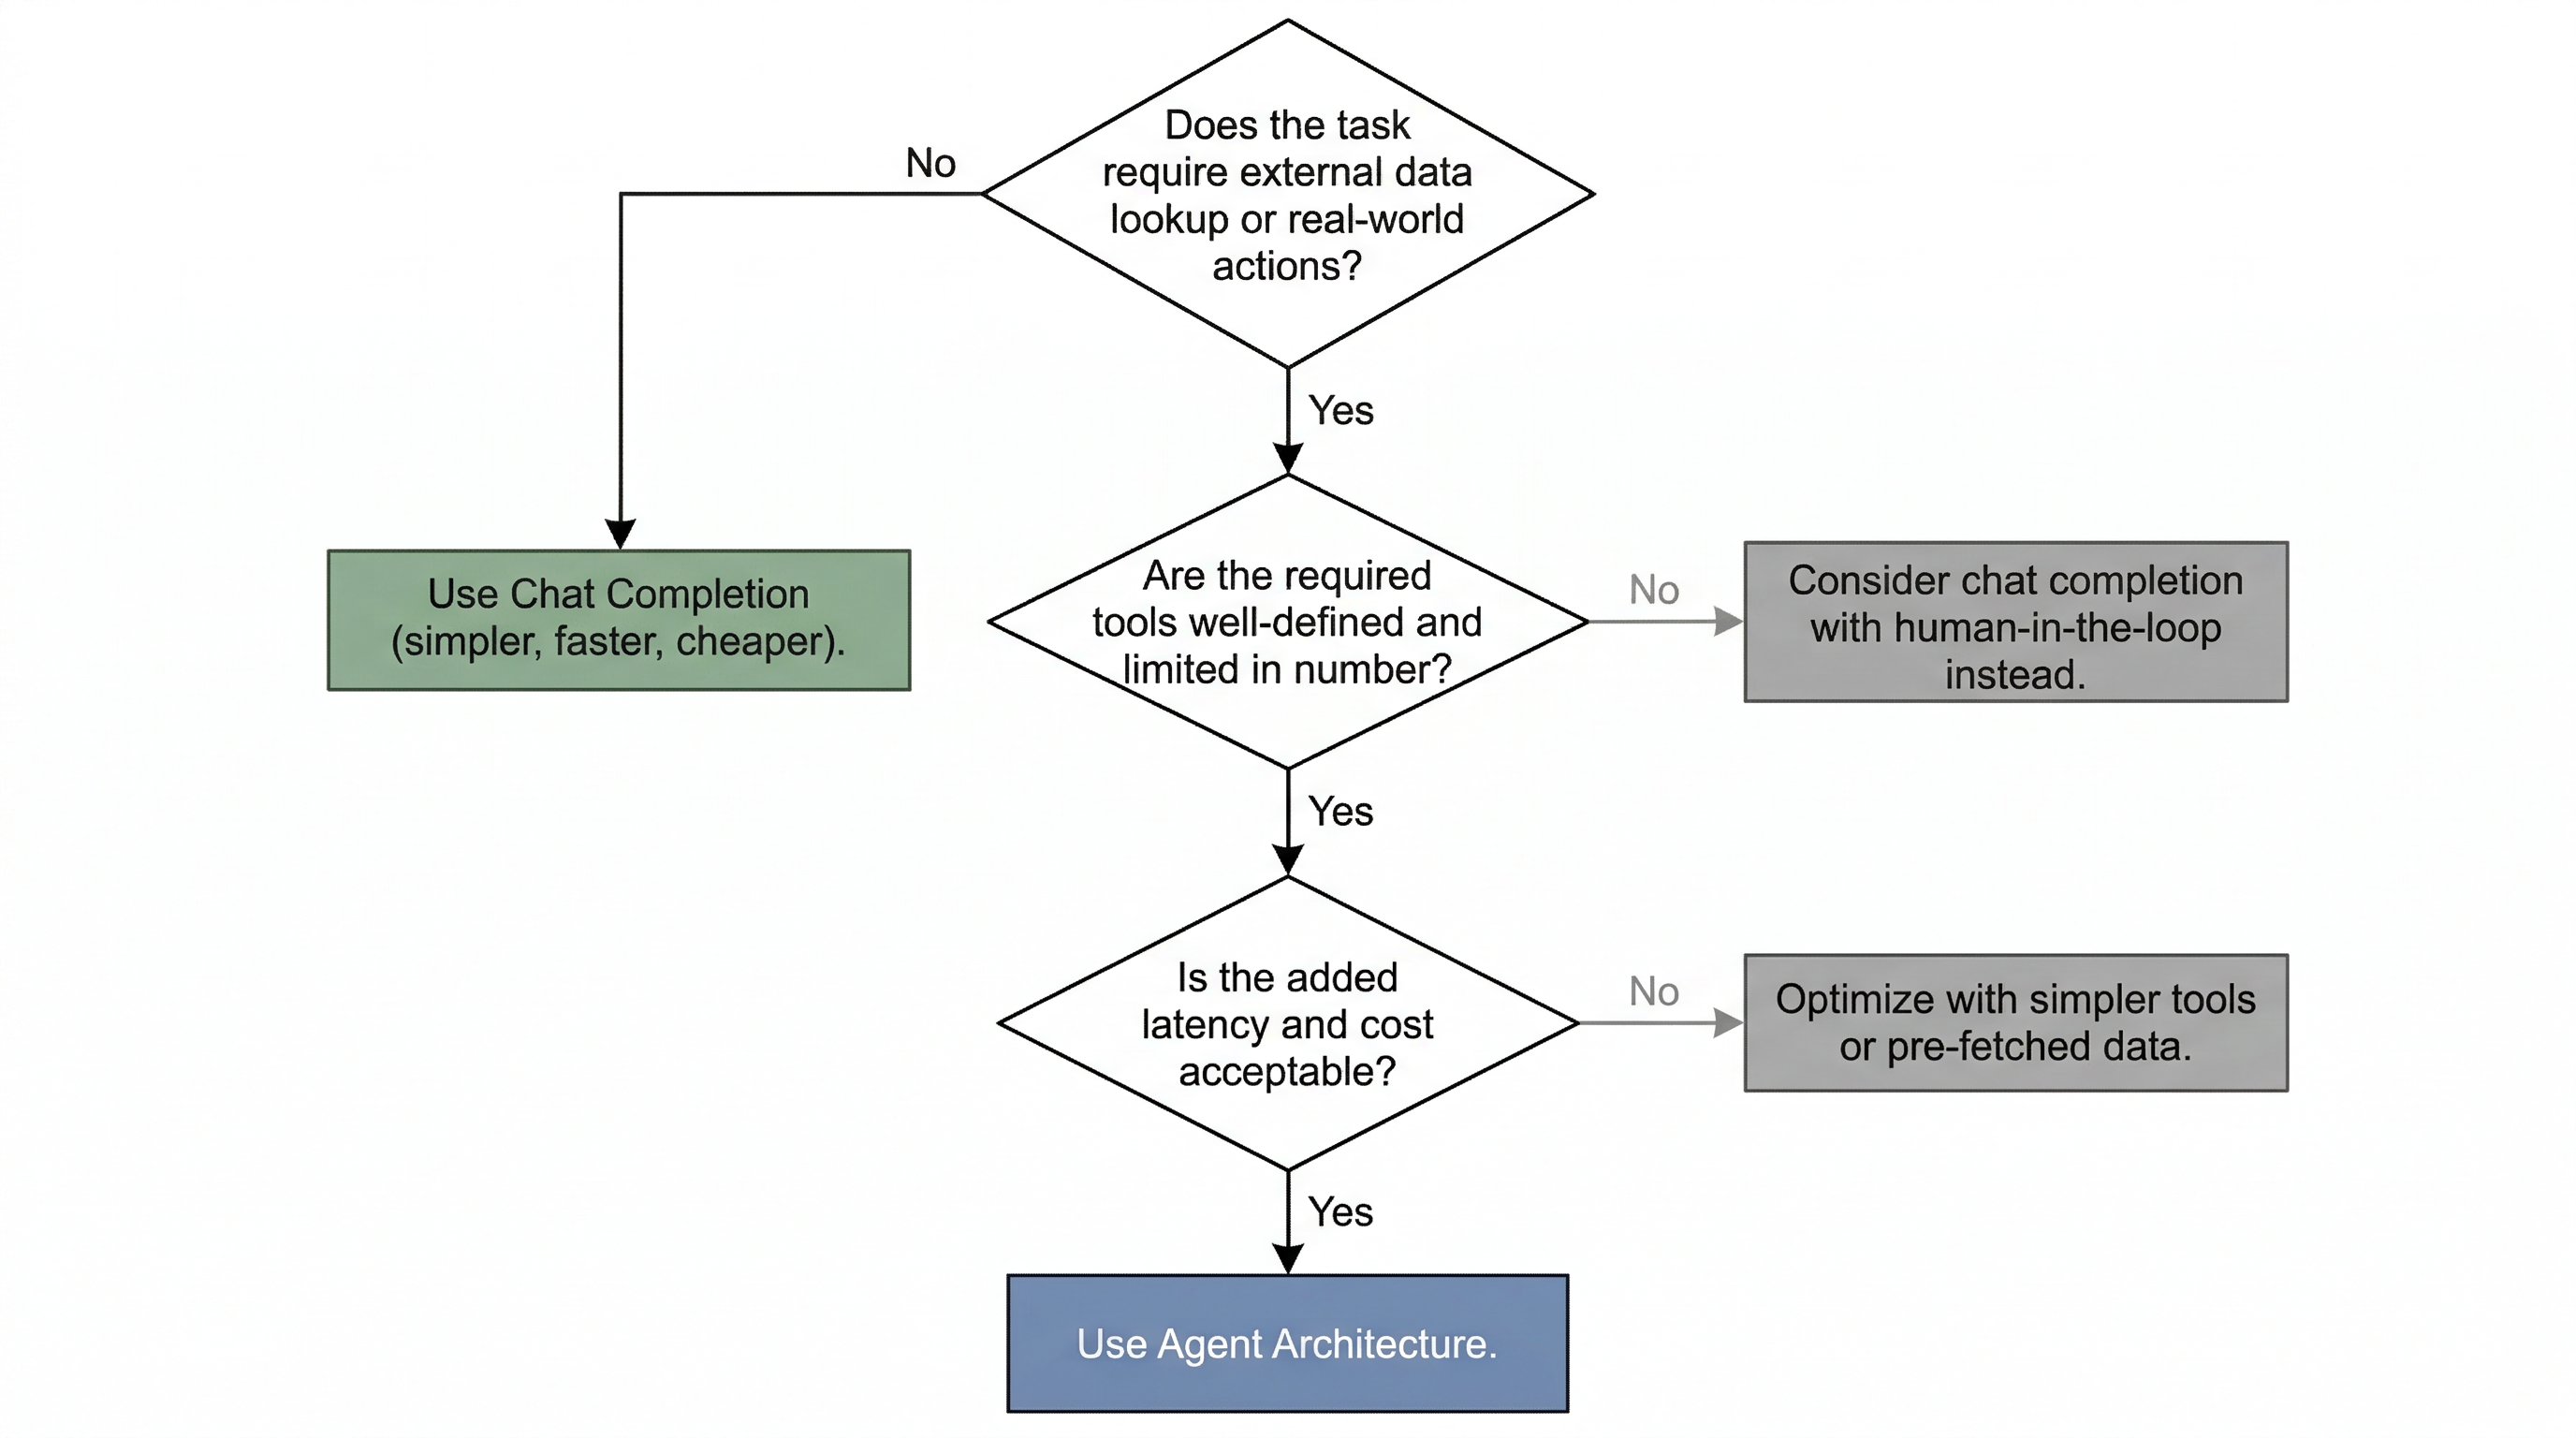
If the answer is no — if everything the model needs is already in the prompt or its training data, and the desired output is text — then standard chat completion is sufficient. Adding an agent layer would introduce complexity without benefit.
If the answer is yes — if the model needs to look up data, call APIs, execute code, or perform actions — then an agent architecture is appropriate. The question then becomes which tools to provide and how to structure the execution loop.
There is a middle ground worth noting. Some tasks involve light external data access that can be handled by your application code rather than by the model itself. For example, if every user query requires a database lookup, you might perform that lookup in your application code and include the results in the prompt, effectively implementing a RAG pattern rather than an agent pattern. The agent pattern is most valuable when the model needs to decide which external actions to take based on the user’s request, rather than following a fixed data retrieval pattern.
3.3.4 Cost and Complexity Considerations
Agent architectures come with real costs that must be weighed against their benefits:
Token costs. Each iteration of the agent loop requires a model inference call. A task that requires three tool calls means at least four inference calls (initial reasoning plus one after each tool result). Each call consumes tokens and incurs charges. For high-volume applications, these costs add up quickly.
Latency. Each loop iteration adds latency. The user must wait for the model to reason, for the tool to execute, and for the model to process the result — potentially multiple times. An agent response that requires three tool calls will take significantly longer than a single chat completion response.
Error handling complexity. Tools can fail. APIs return errors, databases time out, and external services go down. Your agent must handle these failures gracefully — retrying, falling back, or informing the user — which adds engineering complexity. You will address this directly in Section 3.6.
Safety and control. An agent that can take actions in external systems introduces risk. A bug in tool calling logic could lead to unintended actions — canceling the wrong subscription, sending emails to the wrong person, or modifying data incorrectly. You need guardrails, confirmation steps, and audit logging that are not necessary for text-only applications.
|
Do not use an agent when chat completion suffices — agents add complexity that must be justified. Every tool call is an additional point of failure, an additional cost, and an additional latency hit. Before building an agent, ask: "Can I solve this with a well-crafted prompt and a RAG pipeline?" If the answer is yes, the simpler architecture is almost always the better choice. |
3.4 Building Agents with the Foundry Agent Service
With the agent paradigm understood, you can now build one. In Microsoft Foundry, agents are created and run through the Foundry Agent Service. Rather than hand-building the execution loop yourself, you describe an agent declaratively — its instructions, its model, and its tools — and the service runs the propose-execute-observe loop over a conversation thread on your behalf.
This section maps directly to Lab 6 — Build AI agents with portal and VS Code. You will first create and test an agent in the Foundry portal, then build and run the same kind of agent in VS Code with the SDK.
3.4.1 Anatomy of a Foundry Agent: Instructions, Model, and Tools
Every Foundry agent is defined by three things:
-
A model deployment. The underlying chat model (for example, a GPT-4o deployment) that does the reasoning.
-
Instructions. A natural-language description of the agent’s role, goal, and behavior. This is where you define what the agent is for, how it should communicate, and — critically — when and how it should use its tools.
-
Tools. The set of capabilities the agent can call. These can be built-in tools provided by the service or, as you will see in Section 3.5, custom function tools you define yourself.
Writing strong instructions is the single highest-leverage thing you can do for agent quality. Vague instructions ("You are a helpful assistant") produce vague behavior. Specific instructions that state the agent’s goal, its boundaries, and its tool-usage rules produce reliable behavior.
Here is an example set of instructions for a simple inventory-lookup agent:
You are an inventory assistant for Northwind Traders. Your goal is to answer
staff questions about current product stock levels.

GUIDELINES:
- Always use the check_inventory tool to retrieve stock counts. Never guess or
  fabricate a quantity.
- If a product name is ambiguous, ask the user to clarify before calling a tool.
- If a tool call fails, tell the user what went wrong instead of inventing an answer.
- Keep responses short and factual.
3.4.2 Creating and Testing an Agent in the Foundry Portal
The fastest way to create your first agent is in the Foundry portal. The portal gives you a form-driven experience and a built-in playground for testing, with no code required.
The general flow is:
-
Open your Foundry project and navigate to the Agents area.
-
Create a new agent and select the model deployment it should use.
-
Enter the agent’s instructions (its role, goal, and behavior).
-
Attach one or more tools. For your first agent, you might attach a built-in tool; in Lab 7 you will attach a custom function tool.
-
Open the agent in the playground, send it a message, and watch it run — including any tool calls it makes and the results it observes — before producing a final response.
The portal playground is the quickest way to verify that your instructions produce the behavior you want and that the agent selects the right tool at the right time. Iterate on the instructions here until the agent behaves correctly, then move to code.
3.4.3 Building and Running an Agent in VS Code with the SDK
Once you are satisfied with an agent’s design, you will recreate it in code so it can be version-controlled, tested, and integrated into an application. In VS Code, you connect to your Foundry project with the agents SDK, create the agent, start a thread, post a user message, run the agent over that thread, and read the result.
The following Python sample illustrates the shape of this workflow. The exact class and method names depend on the version of the Foundry agents SDK you install, so treat this as a structural template rather than a verbatim API reference — but the sequence of steps (connect → create agent → create thread → add message → run → read messages) is stable across the SDK.
# Illustrative Foundry Agent Service workflow. Verify exact symbol names
# against the SDK version you install (see the callout below).
import os
from azure.identity import DefaultAzureCredential
from azure.ai.projects import AIProjectClient

# 1. Connect to your Foundry project.
project = AIProjectClient(
    endpoint=os.environ["PROJECT_ENDPOINT"],
    credential=DefaultAzureCredential(),
)

# 2. Create an agent: choose a model, give it instructions, attach tools.
agent = project.agents.create_agent(
    model="gpt-4o",                       # your model deployment name
    name="inventory-assistant",
    instructions=(
        "You are an inventory assistant for Northwind Traders. "
        "Always use the check_inventory tool to retrieve stock counts; "
        "never fabricate a quantity. If a tool call fails, say so."
    ),
    tools=[],                             # custom function tools added in Section 3.5
)

# 3. Create a conversation thread and post a user message.
thread = project.agents.threads.create()
project.agents.messages.create(
    thread_id=thread.id,
    role="user",
    content="How many units of the blue widget are in stock?",
)

# 4. Run the agent over the thread. The service drives the execution loop:
#    reason -> propose tool call -> (your handler executes) -> observe -> respond.
run = project.agents.runs.create_and_process(
    thread_id=thread.id,
    agent_id=agent.id,
)

# 5. Read the agent's final response from the thread.
messages = project.agents.messages.list(thread_id=thread.id)
for message in messages:
print(f"{message.role}: {message.content}")|
The code above is illustrative. The Foundry agents SDK evolves quickly, and the precise package, client class, and method names (for example, how agents, threads, runs, and messages are created) differ between SDK versions. Always confirm the current symbols against the SDK version pinned in your lab environment and the official Microsoft Foundry documentation. The lab instructions provide the exact, tested calls — this sample exists to show you the shape of the workflow, not to be copied verbatim. |
3.5 Tools and Custom Function Tools
In Section 3.4 you built an agent and pointed at the idea of attaching tools. This section opens up what a tool actually is. You will learn the anatomy of a tool definition, trace the tool-call lifecycle that connects the model to your code, and then define a custom function tool and register it with an agent. This section maps to Lab 7 — Use a custom function in an AI agent.
3.5.1 Anatomy of a Tool Definition: Name, Description, and Parameter Schema
A tool definition is a structured description you provide to the agent so the model knows what tools are available and how to call them. Every tool definition has three essential components: a function name, a description, and a parameter schema.
The function name is a short, programmatic identifier like get_stock_price or check_inventory. The description is a natural language explanation of what the tool does. The parameter schema specifies what inputs the tool accepts, their types, and which are required. The schema is written in JSON Schema — the same format you have seen for describing structured data.
Here is a tool definition for a market-data lookup:
{
  "type": "function",
  "function": {
    "name": "get_stock_price",
    "description": "Retrieves the current stock price and daily trading summary for a given ticker symbol. Returns the current price, daily high, daily low, opening price, and trading volume. Use this tool when the user asks about a stock's current price or today's trading activity.",
    "parameters": {
      "type": "object",
      "properties": {
        "ticker": {
          "type": "string",
          "description": "The stock ticker symbol, e.g., 'AAPL' for Apple Inc."
        },
        "include_history": {
          "type": "boolean",
          "description": "If true, includes the last 30 days of closing prices in addition to the current price. Defaults to false."
        }
      },
      "required": ["ticker"]
    }
  }
}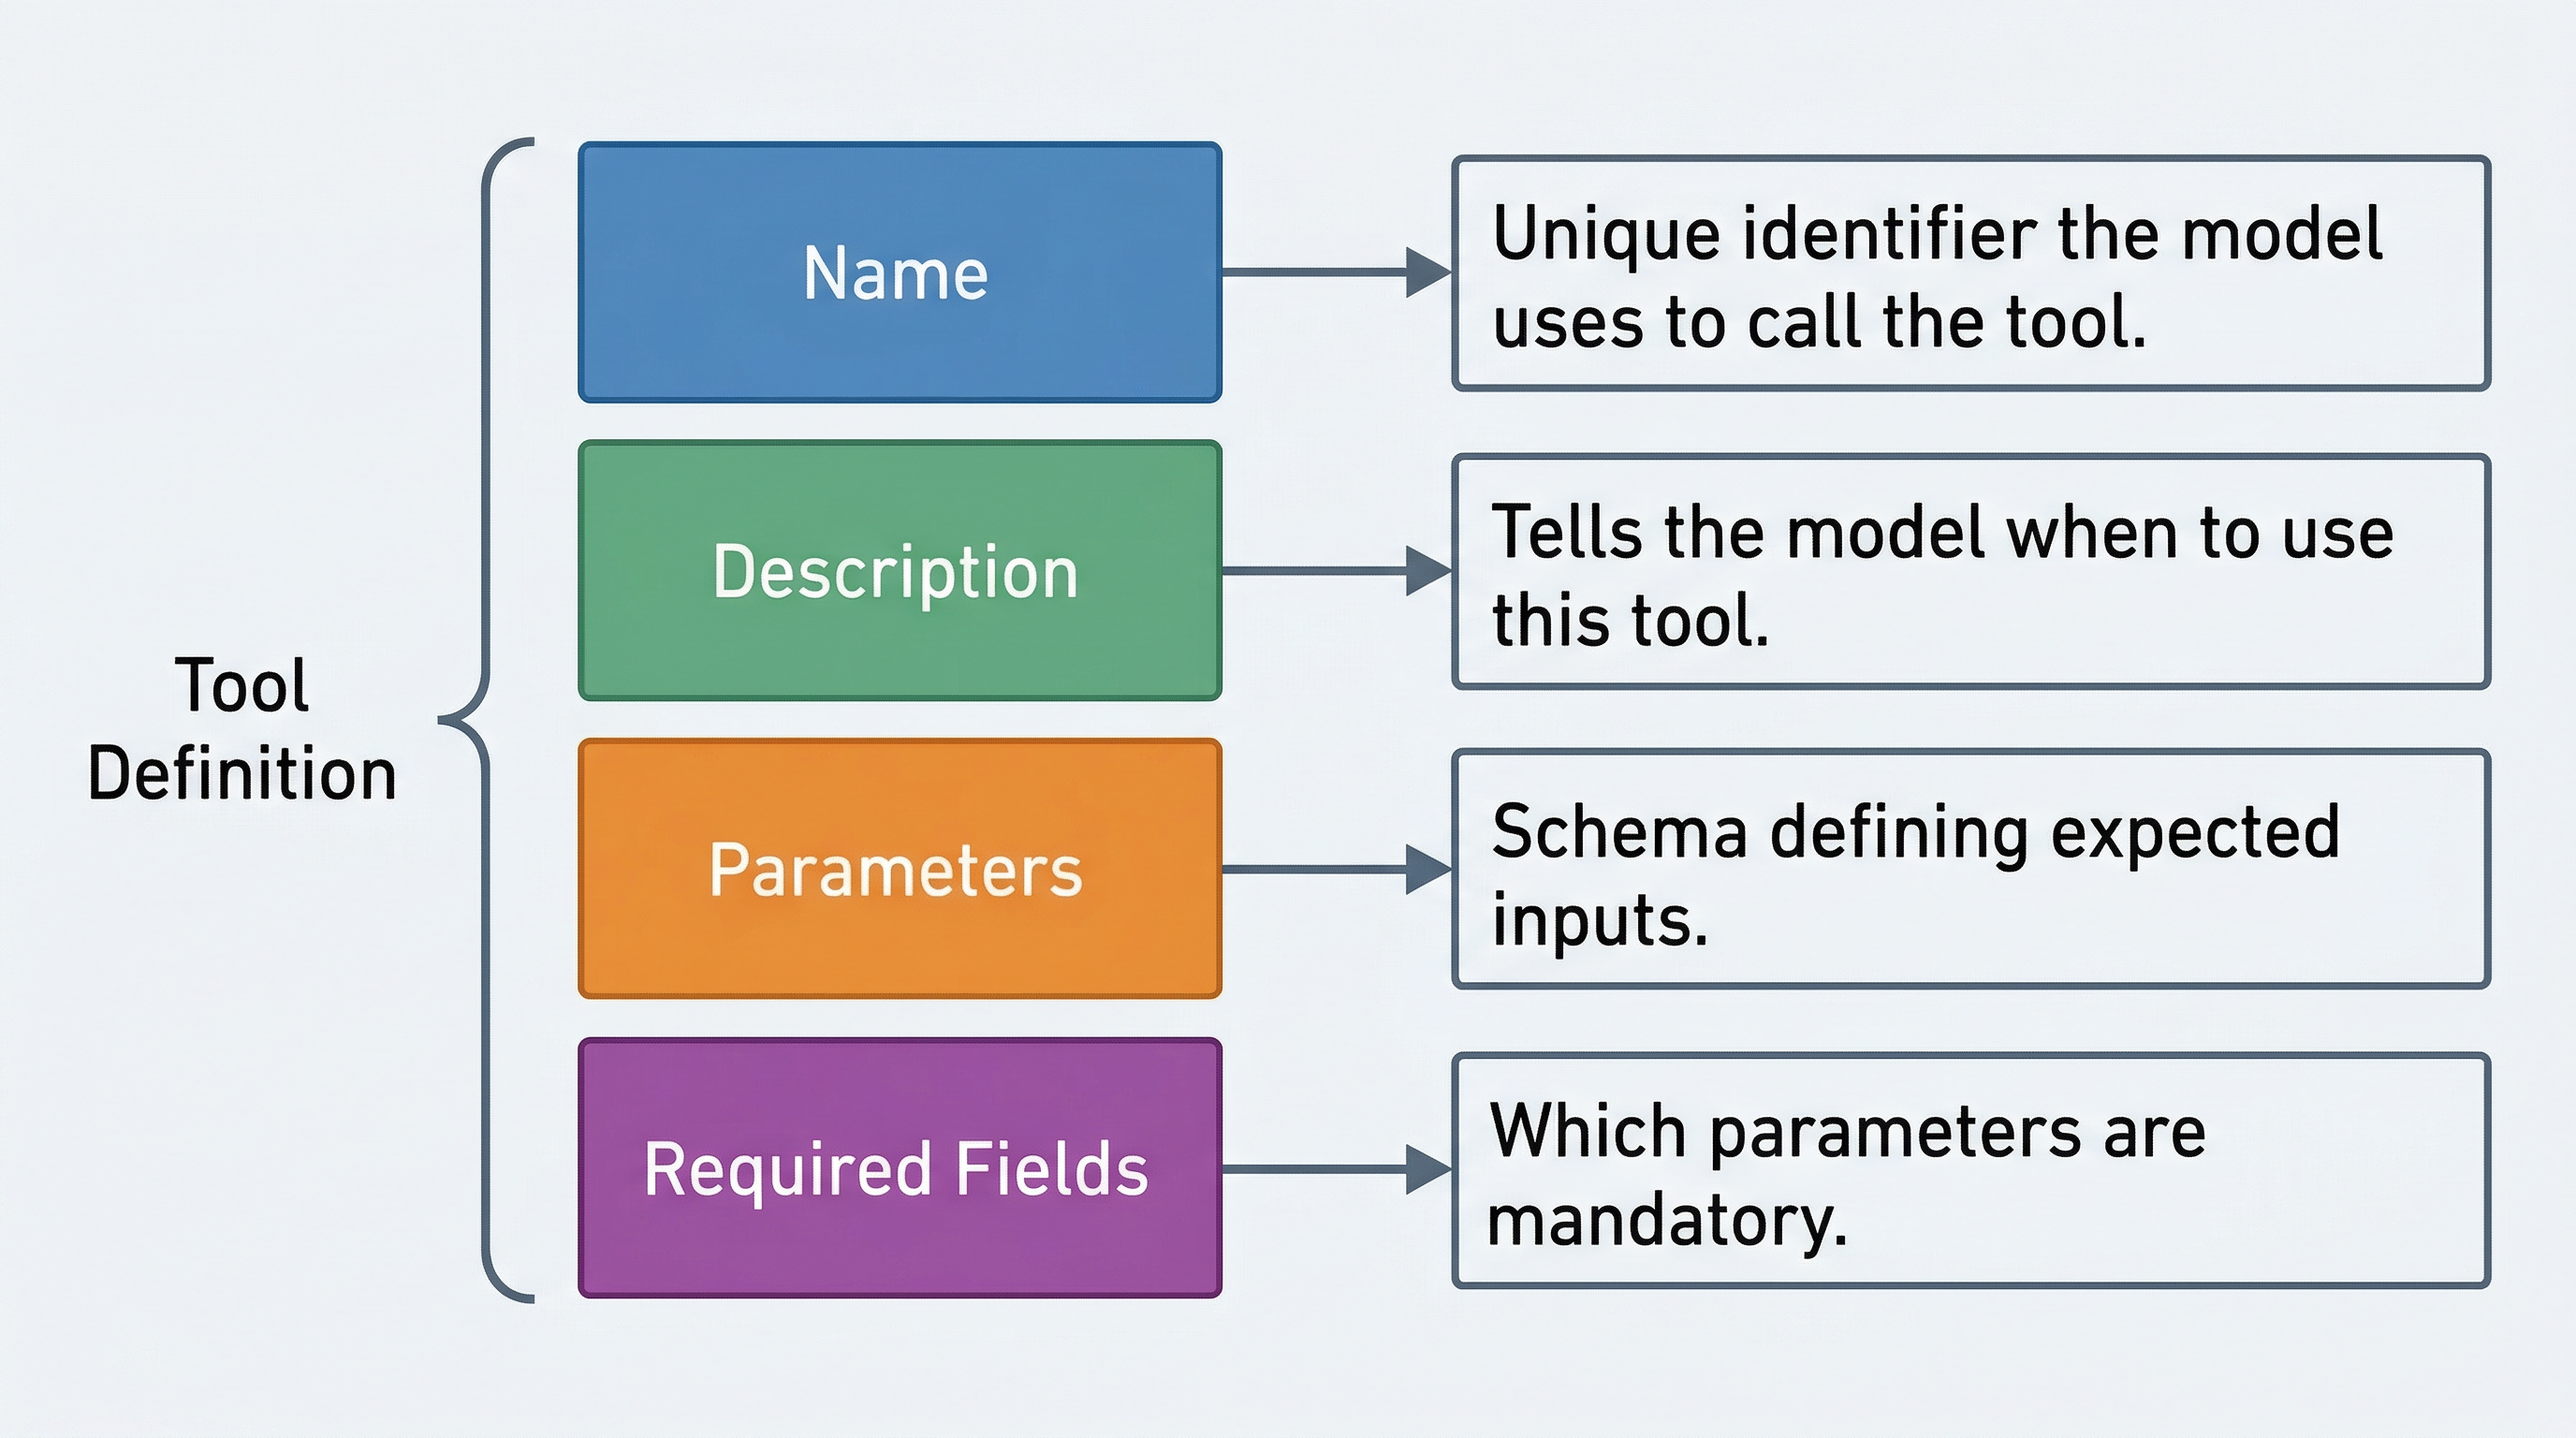
Notice that this definition uses JSON Schema to describe the parameters. The ticker parameter is required, while include_history is optional with a described default. The model reads this schema to understand what arguments it needs to provide when calling the tool.
Here is a critical insight that many developers miss: the model selects tools based on their descriptions, not their code. The model never sees the Python function that implements get_stock_price. It only sees the name, description, and parameter schema you provide. If your description is vague or misleading, the model will make poor tool-selection decisions regardless of how well the underlying function works. Compare:
-
Weak: "Gets stock data."
-
Strong: "Retrieves the current stock price and daily trading summary for a given ticker symbol. Returns the current price, daily high, daily low, opening price, and trading volume. Use this tool when the user asks about a stock’s current price or today’s trading activity."
The weak description gives the model almost nothing to work with. The strong description specifies exactly what the tool returns and when to use it, so the model can make an informed decision.
|
Write tool descriptions as if explaining the function to a colleague who has never seen the code. Include what the tool does, what it returns, and when to use it. The more precise your description, the more accurate the model’s tool selection will be. |
3.5.2 The Tool-Call Lifecycle
The tool calling process follows a three-phase lifecycle that is essential to understand: the model proposes a call, your application executes it, and the result is returned to the model.
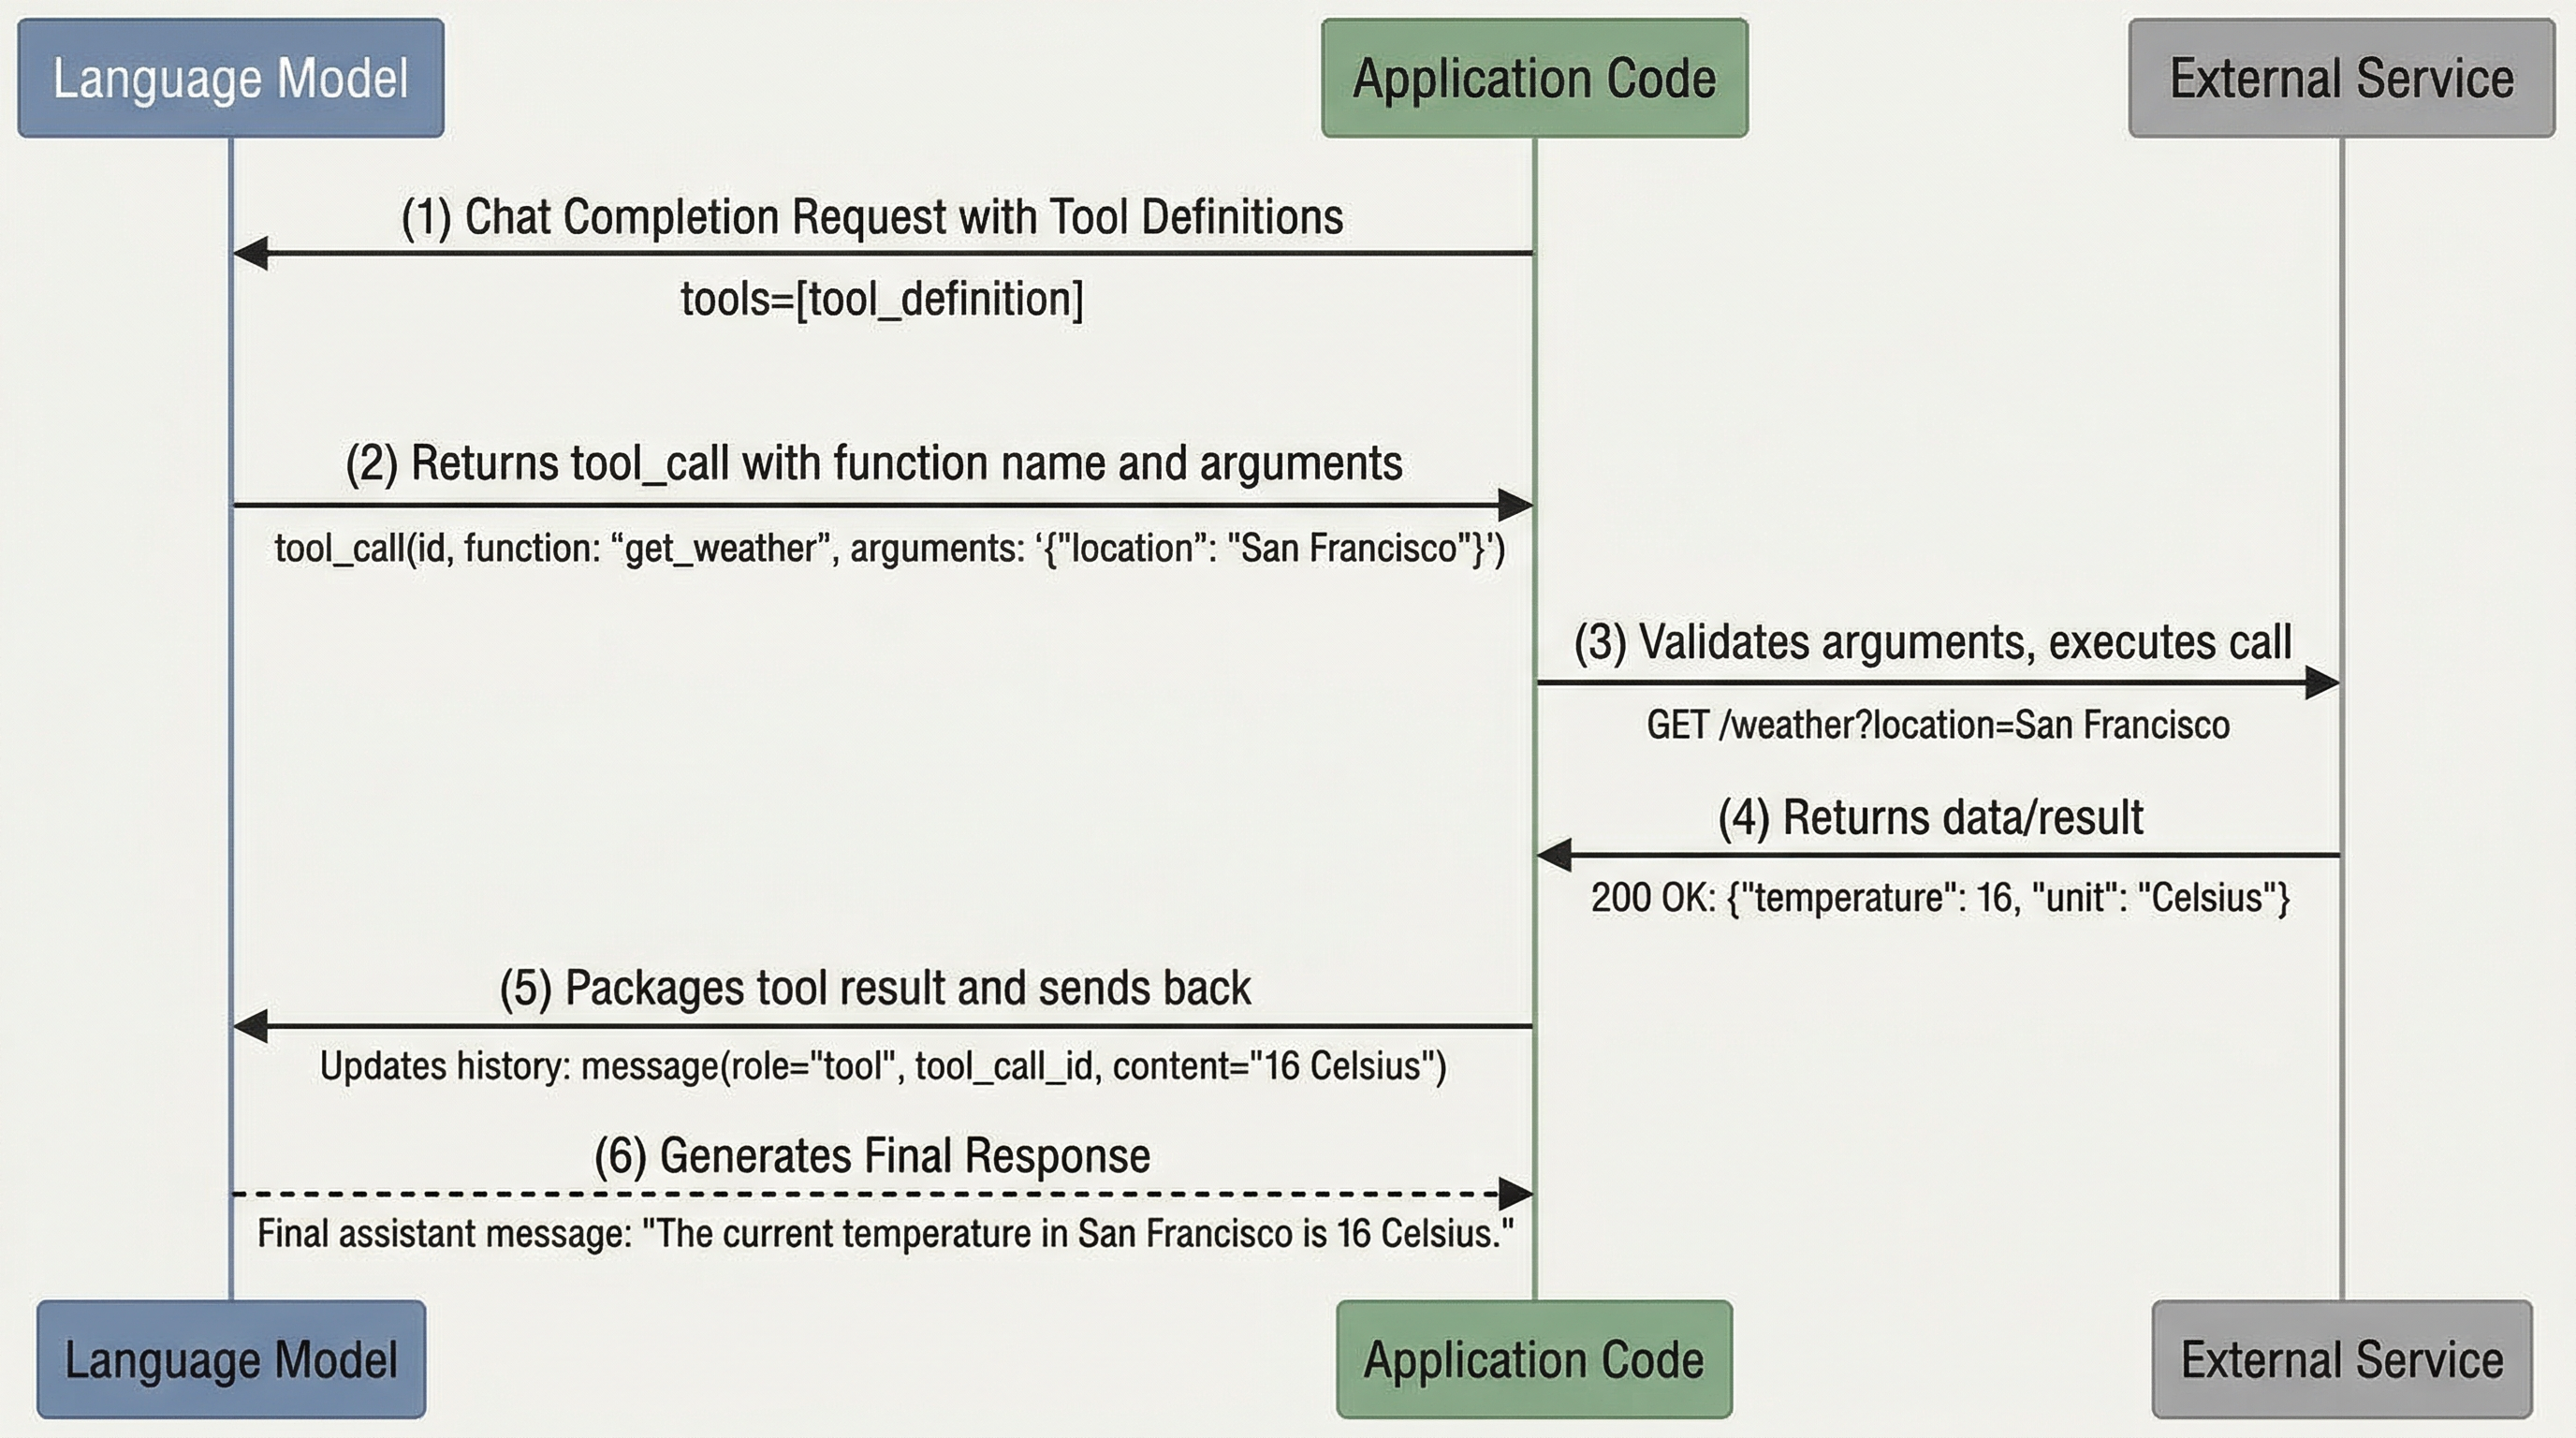
Phase 1: The model proposes a tool call. When the model determines that it needs to use a tool, it does not execute anything. Instead, it returns a structured response indicating which tool it wants to call and what arguments to pass. This response includes the tool name, the arguments as a JSON object, and a unique tool call ID.
Phase 2: Your application executes the tool. Your application code receives the model’s proposal, validates it, and executes the actual function. This is where real work happens — the API call is made, the database is queried, the calculation is performed. Your code is fully in control of this step. You can add logging, validation, rate limiting, error handling, or any other logic before, during, and after execution.
Phase 3: The result is returned to the model. Your application sends the tool’s output back to the model as a new message in the thread. The model reads this result and decides what to do next — it might generate a final text response, or it might propose another tool call to gather additional information.
|
The model never executes tools directly — your application code is the execution layer. The model only proposes tool calls by returning structured data. Your code decides whether to honor those proposals, how to execute them, and what results to return. This separation is a fundamental safety boundary: you control what actions the system actually takes. |
When you use the Foundry Agent Service, the service orchestrates this lifecycle for you during a run, but for a custom function tool your code still supplies the execution in Phase 2. The function that does the real work is yours; the service handles routing the model’s proposal to it and feeding the result back into the thread.
3.5.3 Defining a Custom Function Tool
A function tool wires the tool definition you write to a real function in your code. There are two halves: the definition (the JSON-schema description the model reads) and the implementation (the Python function that runs in Phase 2 of the lifecycle).
Here is a custom function tool for the inventory assistant from Section 3.4. First, the implementation — an ordinary Python function:
import json

def check_inventory(product_name: str, warehouse: str = "main") -> str:
    """Return the current stock count for a product at a warehouse.

    This is the function that runs in Phase 2 of the tool-call lifecycle.
    In a real system this would query a database or inventory API.
    """
    # Stand-in data for illustration; replace with a real lookup.
    stock = {"blue widget": 42, "red widget": 0}
    count = stock.get(product_name.lower())
    if count is None:
        return json.dumps({"error": f"Unknown product: {product_name}"})
    return json.dumps({"product": product_name, "warehouse": warehouse, "in_stock": count})
Second, the definition the model reads. It describes the same function in the name/description/parameter-schema format from Section 3.5.1:
{
  "type": "function",
  "function": {
    "name": "check_inventory",
    "description": "Returns the current number of units in stock for a named product at a given warehouse. Use this tool whenever the user asks how many units of a product are available.",
    "parameters": {
      "type": "object",
      "properties": {
        "product_name": {
          "type": "string",
          "description": "The full product name, e.g., 'blue widget'."
        },
        "warehouse": {
          "type": "string",
          "description": "Warehouse identifier. Defaults to 'main' if not specified."
        }
      },
      "required": ["product_name"]
    }
  }
}
The name in the definition (check_inventory) must match the function your code dispatches to. When the model proposes a call to check_inventory with arguments like {"product_name": "blue widget"}, your code parses those arguments and invokes the real check_inventory function.
3.5.4 Registering the Function Tool with an Agent
Registering a function tool means attaching its definition to the agent so the model knows the tool exists, and wiring its implementation so your code can run it when the model proposes a call. In the Foundry Agent Service, you pass your function tools when you create (or update) the agent. The following illustrative sample extends the agent from Section 3.4.3 to include the custom function tool:
# Illustrative: attaching a custom function tool to a Foundry agent.
# Verify exact symbol names against your installed SDK version.
from azure.ai.agents.models import FunctionTool

# Wrap your real Python function(s) as a function tool. The SDK introspects
# the function signature and docstring to build the JSON parameter schema.
functions = FunctionTool(functions={check_inventory})

agent = project.agents.create_agent(
    model="gpt-4o",
    name="inventory-assistant",
    instructions=(
        "You are an inventory assistant for Northwind Traders. "
        "Always use the check_inventory tool to retrieve stock counts; "
        "never fabricate a quantity. If a tool call fails, say so."
    ),
    tools=functions.definitions,   # the definitions the model reads
)
When the agent runs over a thread and the user asks "How many blue widgets are in stock?", the model proposes a call to check_inventory, your code (or an SDK helper) executes the real function, the JSON result is returned to the thread, and the model uses it to compose a grounded final answer.
|
As in Section 3.4.3, the precise SDK symbols (for example, |
3.6 Handling Tool-Call Errors
Because the model generates tool-call arguments as free-form data, you cannot blindly trust the arguments it provides, and you cannot assume that the underlying function will always succeed. The model might omit a required parameter, provide a value of the wrong type, or call a tool that does not exist. The function itself might time out, hit a rate limit, or get back an empty result. Robust agents validate inputs and handle failures explicitly.
A defensive execution wrapper validates the proposal before running anything and catches failures during execution:
import json

def execute_tool_call(function_name, raw_arguments, available_tools):
    """Safely execute a tool call with validation and error handling.

    Returns a JSON-serializable dict that is sent back to the model in Phase 3.
    """
    # Validate: is this a tool we actually offer?
    if function_name not in available_tools:
        return {"error": f"Unknown tool: {function_name}"}

    # Validate: can we parse the arguments?
    try:
        arguments = json.loads(raw_arguments)
    except json.JSONDecodeError:
        return {"error": "Invalid JSON in tool arguments"}

    tool = available_tools[function_name]

    # Validate: are required parameters present?
    for param in tool.get("required_params", []):
        if param not in arguments:
            return {"error": f"Missing required parameter: {param}"}

    # Execute with error handling.
    try:
        result = tool["handler"](**arguments)
        return {"success": True, "data": result}
    except TimeoutError:
        return {"error": "Tool execution timed out"}
    except Exception as e:
        return {"error": f"Tool execution failed: {str(e)}"}
This wrapper guards against two categories of problems: model errors (the model proposes a bad call — a nonexistent tool, malformed arguments, or a missing parameter) and execution errors (the tool itself fails — a timeout, an exception, or unexpected data). In both cases the wrapper returns a structured error to the model rather than crashing. The model can then read the error in Phase 3, explain to the user what went wrong, or try a different approach.
The agent’s instructions reinforce this at the behavior level. Recall the guideline from Section 3.4.1: "If a tool call fails, tell the user what went wrong instead of inventing an answer." Validation in code and instructions in prose work together.
|
An agent that silently fails and returns a plausible-sounding but incorrect answer is more dangerous than one that explicitly reports an error. Always prefer explicit failure over silent fabrication. When a tool call fails, the agent should tell the user what failed and what information is missing, rather than filling the gap with generated text that looks like real data. |
3.7 Hands-On Connections
The concepts in this chapter come to life in two lab activities. Here is what to focus on in each.
Lab 6: Build AI Agents with Portal and VS Code
In Lab 6, you will create an agent in the Microsoft Foundry portal, test it in the playground, and then rebuild and run it in VS Code with the agents SDK. As you work through the lab, pay attention to the following:
-
Instructions drive behavior. Notice how changing the agent’s instructions changes how it behaves — when it uses a tool, how it phrases answers, and what it refuses to do. Iterate on the instructions in the portal playground before you move to code.
-
Portal-to-code parity. Confirm that the agent you build in VS Code matches the one you tested in the portal. The portal is for fast iteration; the SDK is for version control and integration.
-
Watching the loop run. Observe the agent reason, (optionally) call a tool, observe the result, and then respond. This is the execution loop from Section 3.2.3 in action.
Lab 7: Use a Custom Function in an AI Agent
In Lab 7, you will define a custom function tool — a name, a description, and a JSON parameter schema — and attach it to an agent so the model can call your function. Focus on:
-
Definition vs. implementation. Keep the two halves clear: the definition the model reads (Section 3.5.1) and the function your code runs (Section 3.5.3). The names must match.
-
Tool-call lifecycle in your code. Trace the three phases (propose, execute, return) through the lab. Identify where the model’s proposal arrives, where your function executes, and where the result is handed back.
-
Description quality and tool selection. Experiment with vague versus precise descriptions and watch how that affects whether the model calls your tool at the right time.
-
Failure handling. Make a tool call fail (for example, pass an unknown product) and observe whether the agent reports the failure honestly rather than fabricating a result.
3.8 Assessment Preparation
This week includes two assessments that test your ability to apply the concepts from this chapter. Here is guidance for approaching each one effectively.
Agent vs. Chat Completion (250-400 words initial post)
The discussion asks you to describe one task suited to an agent architecture and one suited to standard chat completion, and to identify the key differentiator between them. To prepare:
-
Choose real, concrete tasks. Do not describe abstract categories — describe specific, named tasks with enough detail that a reader can evaluate whether your architectural choice is justified. "Processing a customer refund" is more concrete than "tasks that require actions."
-
Apply the decision framework. For each task, explain why your chosen architecture is appropriate using the criteria from Section 3.3.3. Does the task require external data access or actions? Can it be accomplished with text generation alone?
-
Identify the key differentiator. What is the single most important factor that makes you choose one architecture over the other? This should be a clear, defensible principle, not a list of minor differences.
There are many valid examples for each architecture. The assessment evaluates the quality of your reasoning and the clarity of your justification, not the specific tasks you choose.
Custom Function Tool Write-Up
This assessment asks you to document the custom function tool you built in Lab 7. To prepare:
-
Present the tool definition. Include the function name, the description, and the JSON parameter schema. Explain why each parameter exists and which are required.
-
Explain the lifecycle. Walk through what happens when the model decides to call your tool: how the proposal arrives, how your code executes the function, and how the result returns to the agent. Tie your explanation to the three phases in Section 3.5.2.
-
Justify the description. Explain how the wording of your tool description helps the model decide when to call it. If you revised the description during the lab, describe what you changed and why.
-
Address one failure mode. Identify one way the tool call could fail and describe how your agent handles it without fabricating a result.
3.9 Key Terms
- AI agent
-
A system built on top of a language model that can take actions in the world through tool calling, going beyond text generation to interact with external systems and data sources.
- agent paradigm
-
The architectural shift from one-shot text generation to an iterative loop in which a model reasons, selects and executes tools, observes results, and continues until a task is complete.
- chat completion
-
The standard interaction pattern where a user sends messages to a language model and receives a text response, without the model taking external actions or calling tools.
- tool
-
A capability — such as a function, API, or knowledge source — that an agent can invoke to obtain data or take an action beyond generating text.
- tool calling
-
The capability of a language model to invoke predefined functions or tools during generation, enabling it to access external data, perform calculations, or trigger actions. Also called function calling.
- execution loop
-
The iterative cycle an agent follows: receive a task, reason about it, select and execute a tool, observe the result, and repeat until the task is complete.
- Foundry Agent Service
-
The service in Microsoft Foundry used to create, configure, and run AI agents. It manages the execution loop over a conversation thread given an agent’s model, instructions, and tools.
- agent instructions
-
The natural-language definition of an agent’s role, goal, constraints, and behavioral guidelines — the agent equivalent of a system prompt — including when and how the agent should use its tools.
- thread
-
The ordered sequence of messages, tool calls, and tool results that make up a single agent conversation. The thread serves as the agent’s short-term memory across the steps of a run.
- tool definition
-
A structured description of a tool available to an agent, including its name, a natural-language description, and a JSON Schema specification of its parameters.
- function tool
-
A tool whose implementation is a custom function you write. It has two halves: the definition the model reads (name, description, parameter schema) and the function in your code that runs when the tool is called.
- tool call
-
A structured proposal emitted by the model indicating which tool it wants to invoke and with what arguments. The application — not the model — decides whether and how to execute it.
- tool-call lifecycle
-
The three-phase process of tool usage: the model proposes a tool call, the application validates and executes it, and the result is returned to the model for further reasoning.
3.10 Chapter Summary
This chapter marked your transition from generating text to taking action. You learned the agent paradigm: instead of a single text-in, text-out exchange, an agent runs an iterative execution loop — receive task, reason, select tool, execute, observe, repeat — that lets a language model interact with external systems through tool calling. You also learned the decision framework for when an agent is warranted: if a task requires external data or actions beyond text generation, an agent is appropriate; if it can be done with text alone, simpler chat completion is the better choice. (Evaluation of an agent’s output still matters — those disciplines were covered in Chapters 1 and 2.)
You then built agents with the Foundry Agent Service, which packages an agent as a model, a set of instructions, and a collection of tools, and runs the loop over a conversation thread. You created and tested an agent in the Foundry portal, then rebuilt it in VS Code with the SDK (Lab 6). You opened up what a tool actually is: the anatomy of a tool definition (name, description, and JSON parameter schema), the three-phase tool-call lifecycle (the model proposes, your code executes, the result returns), and how to define a custom function tool and register it with an agent (Lab 7). Finally, you learned to handle tool-call errors so that an agent fails explicitly rather than fabricating a result — validating proposals in code and reinforcing honest failure in the agent’s instructions.
These foundations — instructions, tool definitions, the tool-call lifecycle, and error handling — are the architectural vocabulary for the rest of the agent arc. In Chapter 4, "Agent Knowledge & Protocols: MCP & Foundry IQ", you will extend agents beyond hand-written functions by connecting them to standardized tool servers through the Model Context Protocol and to managed knowledge through Foundry IQ. The custom function tools you built here are the simplest case of a much larger ecosystem of agent capabilities ahead.