Chapter 1: Foundations: Models, Deployment & Evaluation
Learning Objectives
By the end of this chapter, you will be able to:
-
Prepare a Microsoft Foundry project for secure development by configuring keyless authentication with managed identity instead of API keys.
-
Compare deployment options (serverless vs. provisioned) for language models in Microsoft Foundry based on cost, latency, and capability factors.
-
Configure a chat completion API call with appropriate parameters (temperature, max tokens, system message).
-
Compare candidate models side by side and interpret evaluation output (quality, latency, and cost metrics) to justify a model choice.
-
Explain how model selection decisions affect application performance and cost.
1.1 Introduction: Choosing the Right Model for the Job
Imagine you are the lead developer at a growing startup called HelpDesk Hero. Your company has just secured funding to build an AI-powered customer service chatbot that will handle thousands of inquiries per day. The executive team wants it deployed quickly, but they also care about response quality, latency, and — of course — keeping costs under control.
You sit down with your team and realize that the technical decisions ahead of you are not about whether to use a language model, but how to use one. Which model should you choose from the dozens available? Should you pay per token as requests come in, or reserve dedicated capacity up front? What parameters should you set to get responses that are accurate without being robotic? These are not abstract questions — they determine whether your chatbot delights customers or frustrates them, whether your cloud bill is manageable or alarming, and whether your application can scale as the business grows.
This chapter equips you with the foundational knowledge to make these decisions confidently. You will learn how to prepare a Microsoft Foundry project for secure development, explore the model catalog, understand the differences between serverless and provisioned deployment options, configure chat completion API calls with parameters that shape model behavior, compare and evaluate candidate models, and reason about how model selection affects performance, cost, and user experience downstream.
Here is the roadmap for the chapter:
-
Section 1.2 introduces the Microsoft Foundry platform, how to prepare a project, and how to authenticate securely without API keys.
-
Section 1.3 compares deployment options — serverless and provisioned — so you can match deployment strategy to application requirements.
-
Section 1.4 walks through the anatomy of a chat completion API call, including the parameters that control model behavior.
-
Section 1.5 examines how your choice of model ripples through every aspect of application performance and cost.
-
Section 1.6 shows how to compare candidate models side by side and read evaluation metrics so you can justify a model choice with evidence.
-
Sections 1.7 and 1.8 connect the chapter material to your hands-on labs and the discussion post assessment.
By the end, you will have a clear framework for approaching the project setup, deployment, configuration, and evaluation decisions that every generative AI project demands.
1.2 The Microsoft Foundry Platform
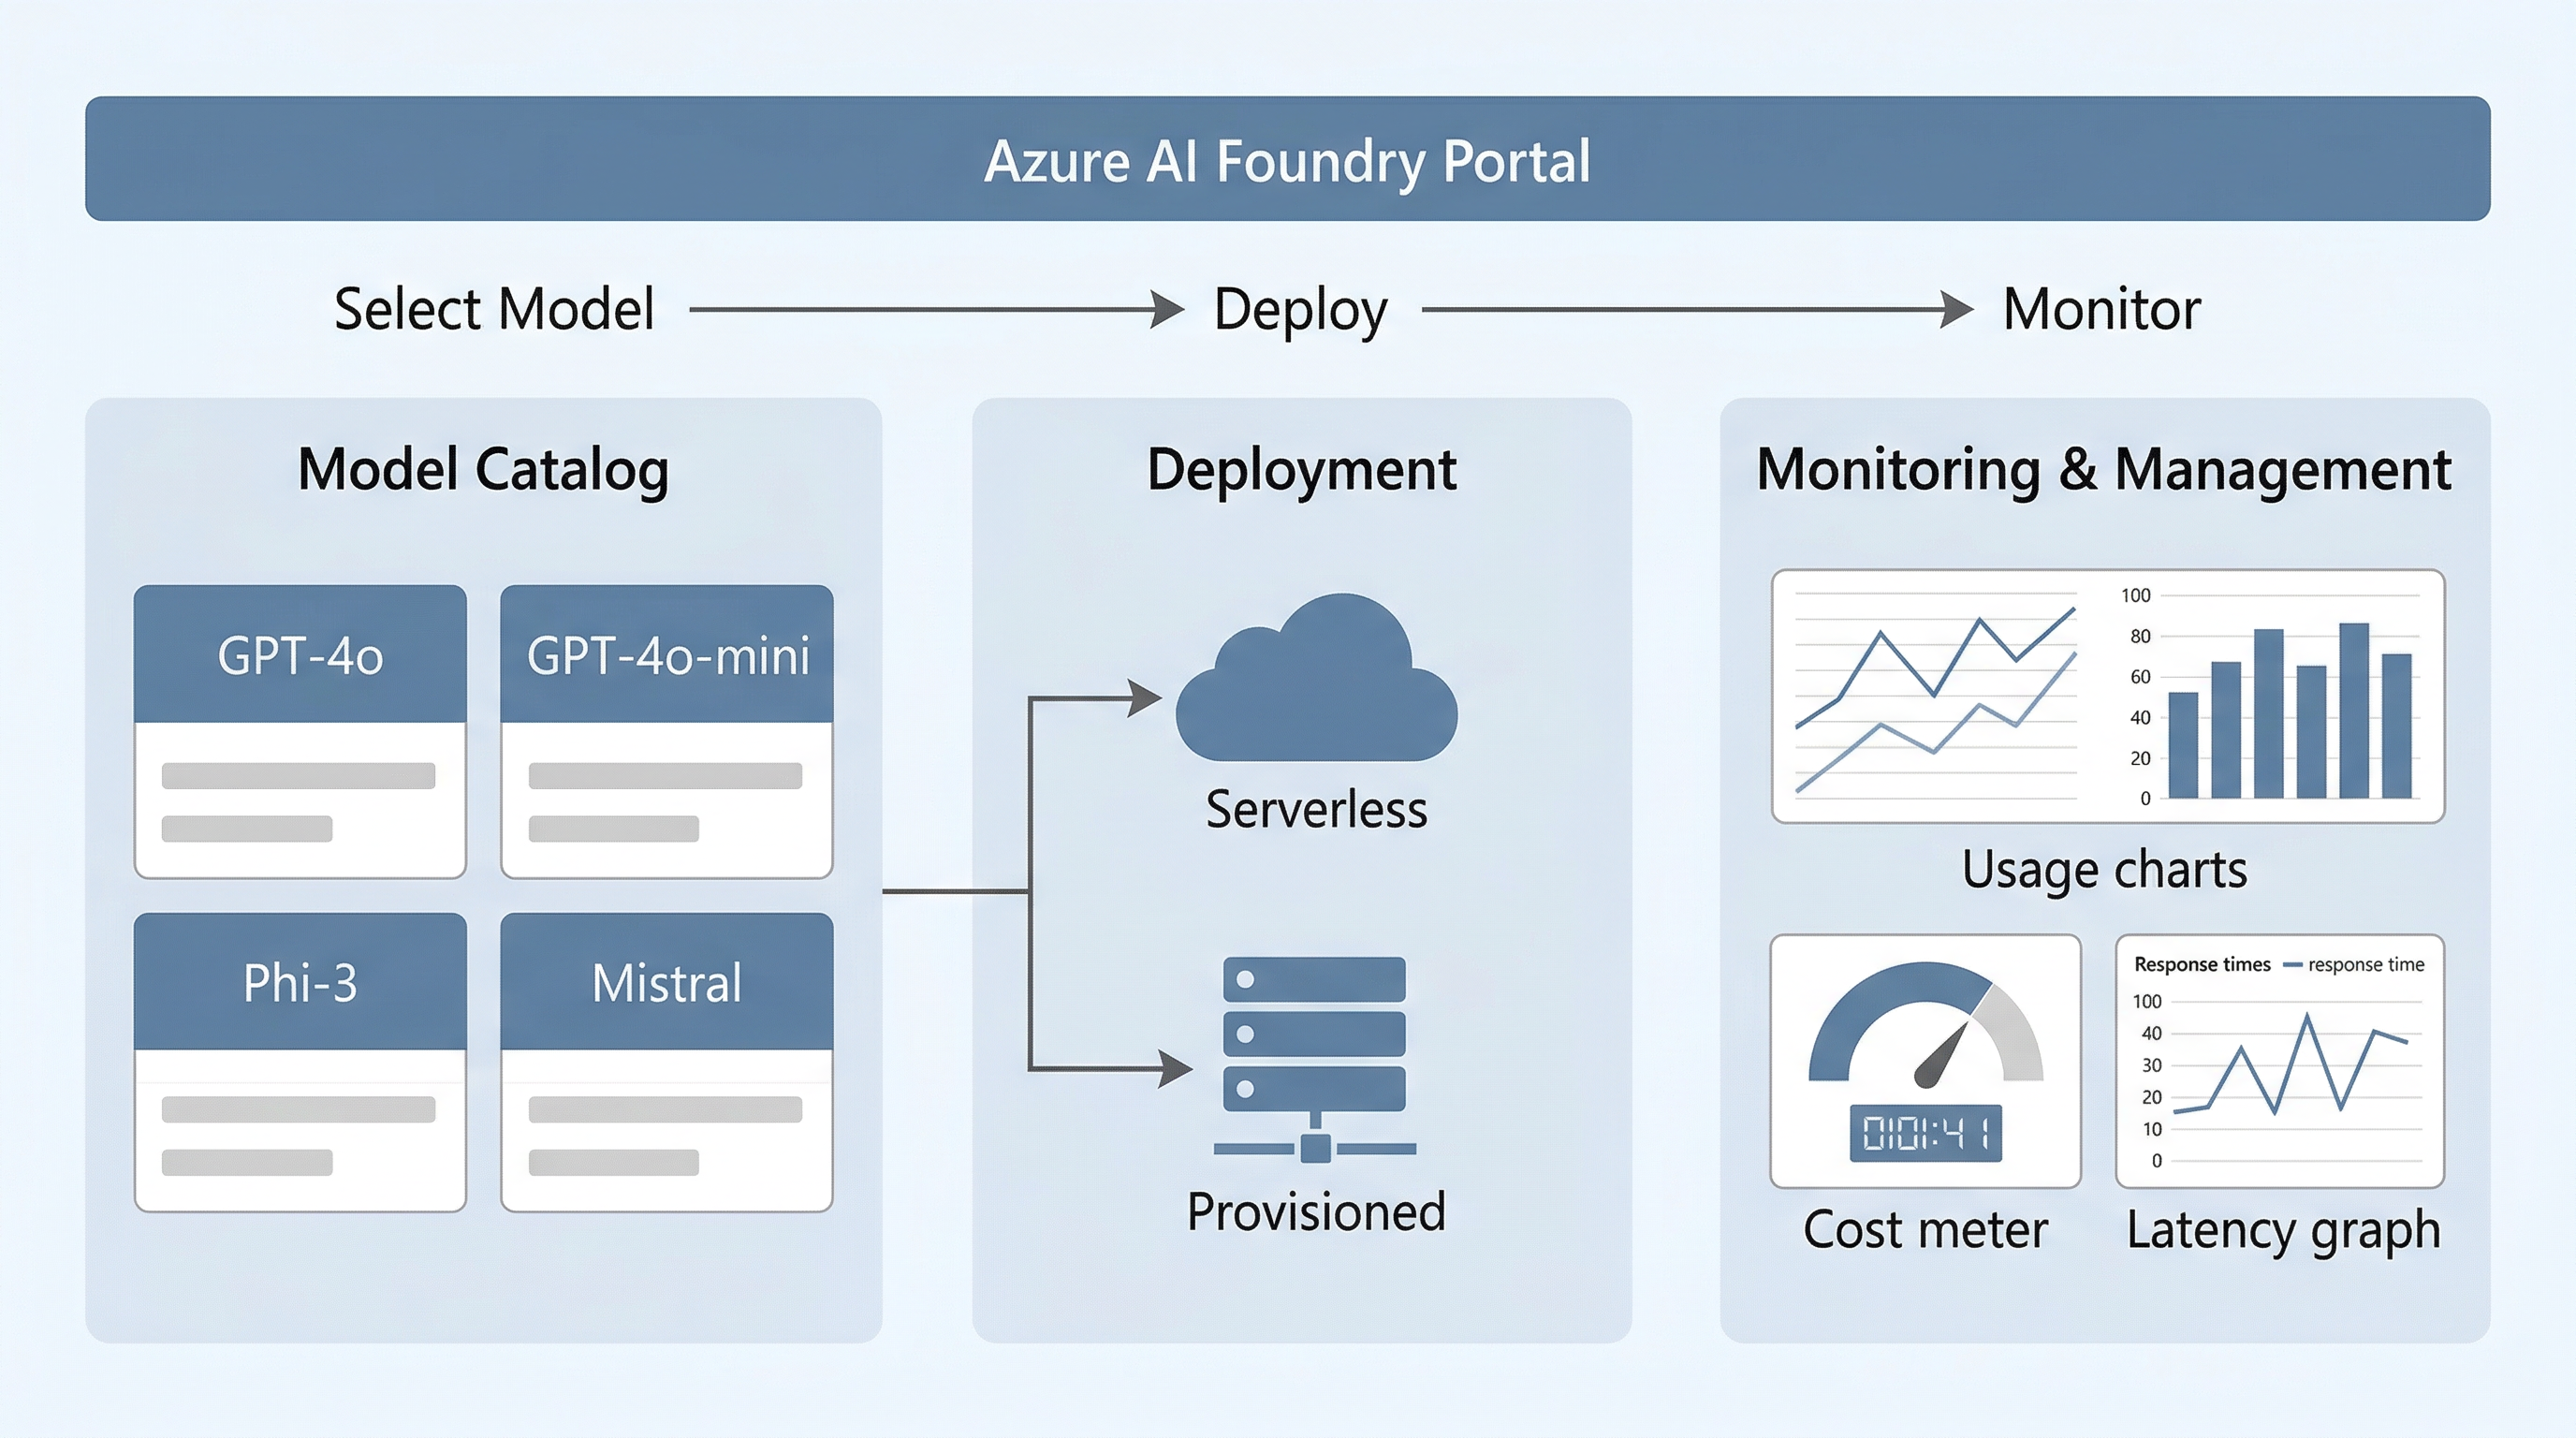
Microsoft Foundry is Microsoft’s unified platform for discovering, deploying, and managing AI models. It brings together model selection, deployment configuration, monitoring, and responsible AI tooling into a single environment. Whether you are experimenting with a prototype or running a production workload, Microsoft Foundry provides the infrastructure and interfaces you need.
What Microsoft Foundry Provides
Microsoft Foundry offers three core capabilities that you will use throughout this course:
Model Catalog. The model catalog is a searchable directory of language models from multiple providers, including OpenAI, Meta, Mistral, and Microsoft. Each model in the catalog has a model card — a summary page that describes the model’s capabilities, supported tasks, pricing, context window size, and regional availability. The model catalog is your starting point for any deployment decision, because it lets you compare models side by side before committing resources.
Deployment Management. Once you select a model, Microsoft Foundry provides the tools to deploy it as an API endpoint. You can choose between deployment options (which we cover in detail in Section 1.3), configure scaling settings, and manage endpoint lifecycle — all from the portal or programmatically through the Azure SDK. Each deployment produces an API endpoint — a URL that your application calls to send prompts and receive completions.
Monitoring and Responsible AI. After deployment, Microsoft Foundry provides dashboards for tracking usage, latency, error rates, and token consumption. It also integrates content safety tools, which you will explore in depth in Chapter 2.
Navigating the Foundry Portal
When you first open the Microsoft Foundry portal, you will see a project-based workspace. Each project groups related deployments, datasets, and evaluation runs. Within a project, the left navigation panel gives you access to the model catalog, your active deployments, a playground for interactive testing, and evaluation tools.
The playground is particularly useful during development. It lets you send prompts to a deployed model, adjust parameters in real time, and observe how changes affect output — all without writing code. You will use the playground extensively in Lab 1 to verify that your project is set up correctly before you build an application on top of it in Lab 3.
|
Platform rename notice: Microsoft Foundry was formerly called "Azure AI Foundry," and Foundry Tools were formerly called "Azure AI Services." Older documentation, tutorials, and certification study materials may still use those earlier names. Similarly, if a tutorial references the "Azure OpenAI Studio" portal, you can follow the same workflow in the Microsoft Foundry portal — the underlying capabilities are equivalent. When you encounter the old names in external resources, substitute the current names and continue; the steps are the same. |
Preparing a Foundry Project
Before you deploy a model or write a line of application code, you create a Foundry project. A project is the organizing container for your work: it holds your deployments, connects to the underlying Foundry Tools resource, stores datasets and evaluation runs, and applies access control. Creating a project is the first thing you do in Lab 1, and getting the setup right at this stage saves you from rework — and from security and cost surprises — later.
When you create a project, you make a few foundational decisions:
-
Region. You choose the Azure region that hosts your project’s resources. Region matters because not all models are available everywhere, latency is lower when your resources sit near your users, and some organizations have data-residency requirements that constrain where data may be processed. Check the model catalog for regional availability before you commit.
-
Resource and connections. A project connects to a Foundry Tools resource, which is the billable Azure resource that backs your model endpoints. One resource can support multiple projects, which helps teams keep work organized while consolidating billing.
-
Access and identity. You decide who — and what — can access the project. This is where authentication choices begin, and they have direct consequences for security.
Secure Authentication: Keyless Access with Managed Identity
Every call your application makes to a Foundry endpoint must be authenticated. There are two broad approaches, and the choice between them is one of the most consequential security decisions you make at project setup.
The first approach is API keys. When you deploy a model, Foundry generates a secret key string. Your application sends that key with every request to prove it is authorized. API keys are simple to use and convenient for quick experiments, which is why most introductory tutorials — and the first code example in this chapter — use them. But keys are also a liability: a key is a long-lived secret that grants full access to the resource, it is easy to accidentally commit to source control or paste into a chat message, and rotating a leaked key means updating every application that uses it.
The second approach is keyless authentication using managed identity. Instead of a static secret, your application authenticates as a trusted Azure identity, and Azure issues a short-lived access token automatically. With managed identity, there is no key to store, leak, or rotate — the identity is granted permission to the Foundry resource through Azure role-based access control (RBAC), and credentials are managed by the platform. This is the approach Microsoft recommends for production workloads, and it is a recurring theme of the AI-103 "plan and manage" domain.
In Python, the azure-identity library provides DefaultAzureCredential, which automatically discovers the right credential for your environment — your signed-in developer account during local development, and a managed identity once the application runs in Azure. You will see how the key-based and keyless patterns differ in the code examples in Section 1.4. Keyless access is the recommended production approach; you should reach for API keys only for short-lived local experiments.
Quotas, Cost, and Monitoring
Part of planning a project is understanding its limits and its bill before you hit them in production:
-
Quotas. Each model deployment has a quota — a ceiling on tokens per minute or requests per minute. Exceeding the quota results in throttling. You can view and request quota changes in the portal, and you should size quota to your expected peak traffic.
-
Cost. Serverless deployments bill per token; provisioned deployments bill hourly for reserved capacity (covered in Section 1.3). Tagging resources and reviewing the cost analysis dashboard helps you attribute spend and catch runaway usage early.
-
Monitoring. Foundry’s dashboards track usage, latency, error rates, and token consumption over time. Establishing monitoring during setup — rather than after an incident — means you have the baselines you need to spot anomalies.
These planning concerns are foundational here; you will return to quotas, cost management, and monitoring in greater depth as you build production-grade solutions later in the course.
1.3 Deployment Options for Language Models
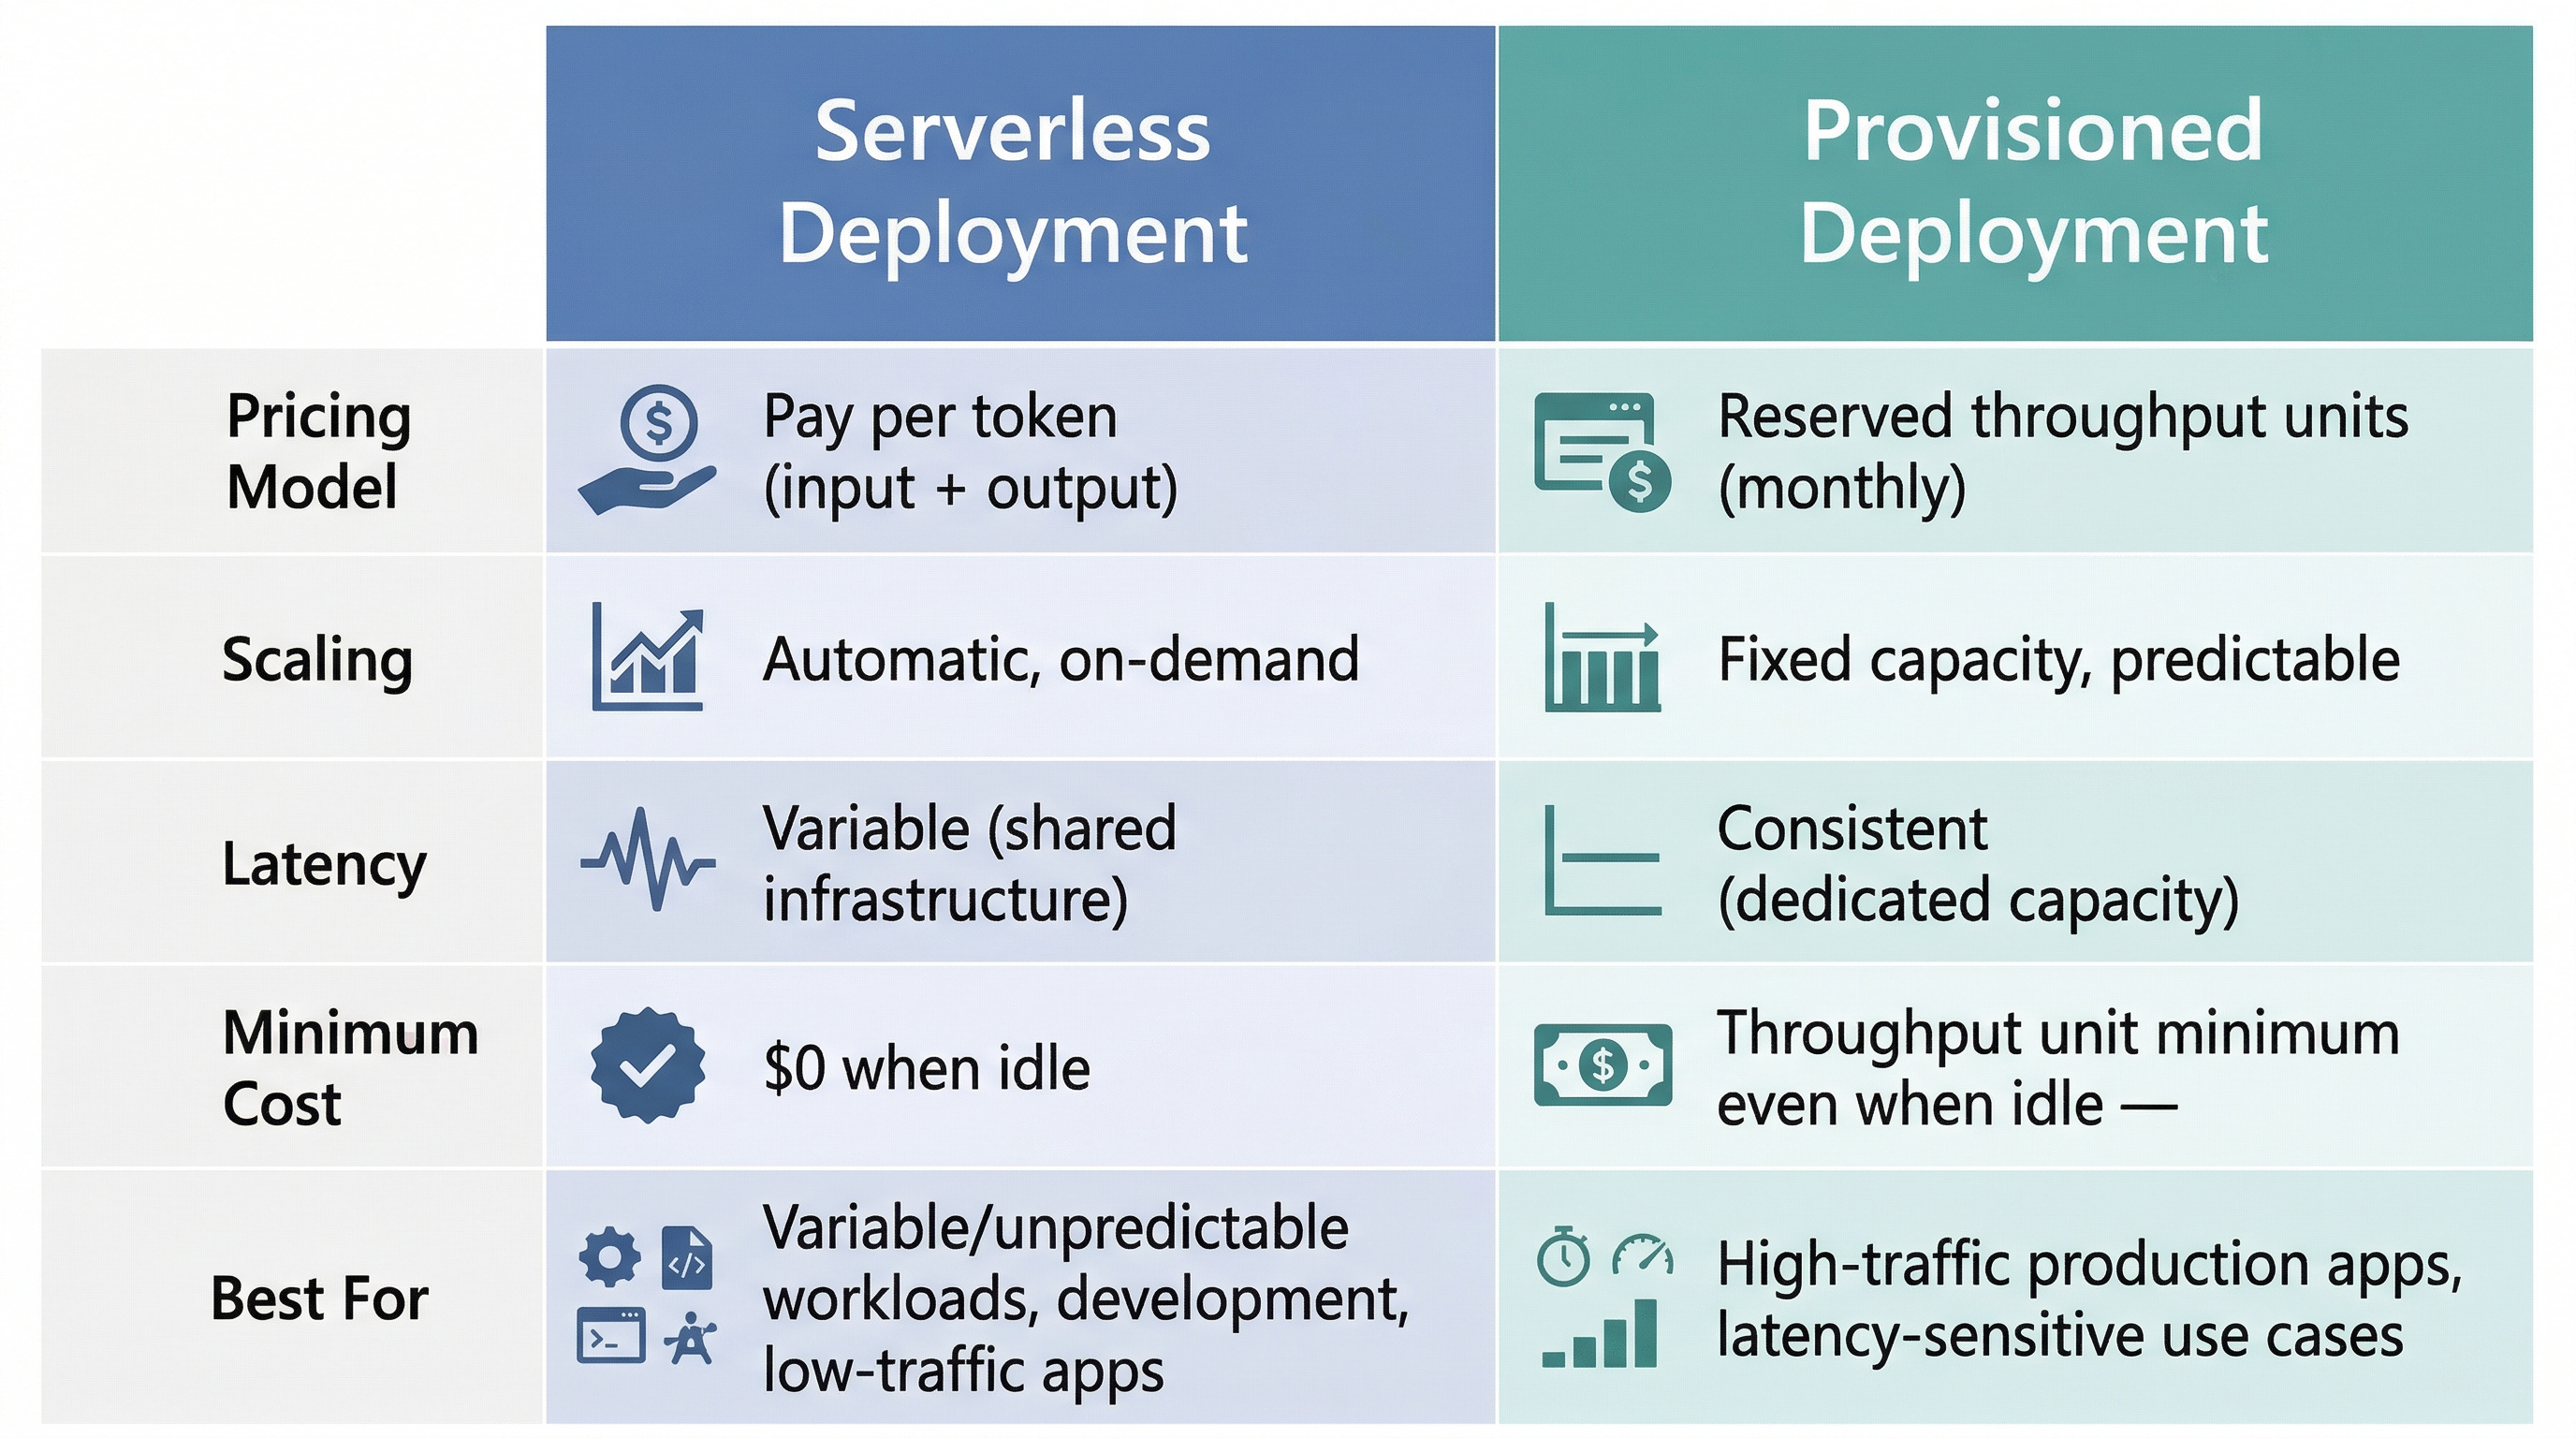
Once you have selected a model from the catalog, your next decision is how to deploy it. Microsoft Foundry offers two primary deployment options: serverless and provisioned. Each option represents a different set of tradeoffs among cost, latency, scalability, and management overhead. Understanding these tradeoffs is essential for making a deployment choice that fits your application’s requirements.
Serverless Deployment
A serverless deployment is the simplest way to get a model running. You deploy the model, receive an API endpoint, and pay only for the tokens you consume — there is no reserved capacity and no infrastructure to manage. Azure handles scaling automatically: if your application sends ten requests per minute or ten thousand, the platform allocates compute resources on demand.
The pricing model for serverless deployments is pay-per-token. You are billed based on the number of input tokens (the prompt you send) and output tokens (the completion the model generates). This makes serverless deployment ideal for workloads with variable or unpredictable traffic, because you never pay for idle capacity.
However, serverless deployments come with tradeoffs. Because resources are allocated on demand, you may experience higher and less predictable latency — the time between sending a request and receiving a response. During periods of high platform demand, serverless endpoints may also be subject to rate limiting or throttling, which can affect throughput. For a prototype or internal tool with modest traffic, these tradeoffs are usually acceptable. For a customer-facing chatbot processing thousands of requests per hour, they may not be.
Provisioned Deployment
A provisioned deployment reserves dedicated compute capacity for your model using throughput units (PTUs). Each throughput unit represents a fixed amount of processing capacity, measured in tokens per minute. When you create a provisioned deployment, you specify the number of throughput units you need, and Azure allocates that capacity exclusively for your endpoint.
The key advantage of provisioned deployment is predictable performance. Because capacity is reserved, your endpoint delivers consistent latency regardless of platform-wide demand. There is no throttling and no competition with other tenants for compute resources. This makes provisioned deployment the right choice for production workloads where response time guarantees matter — for example, a customer service chatbot that must respond within 200 milliseconds.
The tradeoff is cost structure. Provisioned deployments are billed hourly for the reserved throughput units, whether or not you use them. If your application has low or sporadic traffic, you are paying for capacity that sits idle. Provisioned deployment also requires you to estimate your throughput needs in advance, which adds a planning step that serverless deployment does not require.
Comparing Deployment Models
The following table summarizes the key differences:
| Factor | Serverless | Provisioned |
|---|---|---|
Pricing model |
Pay-per-token |
Hourly rate per throughput unit |
Latency |
Variable; depends on platform load |
Consistent and predictable |
Scaling |
Automatic (platform-managed) |
Manual (you choose throughput units) |
Best for |
Prototypes, variable traffic, cost-sensitive exploration |
Production workloads, steady traffic, latency-sensitive applications |
Risk |
Throttling under high demand |
Paying for unused capacity |
A Decision Framework
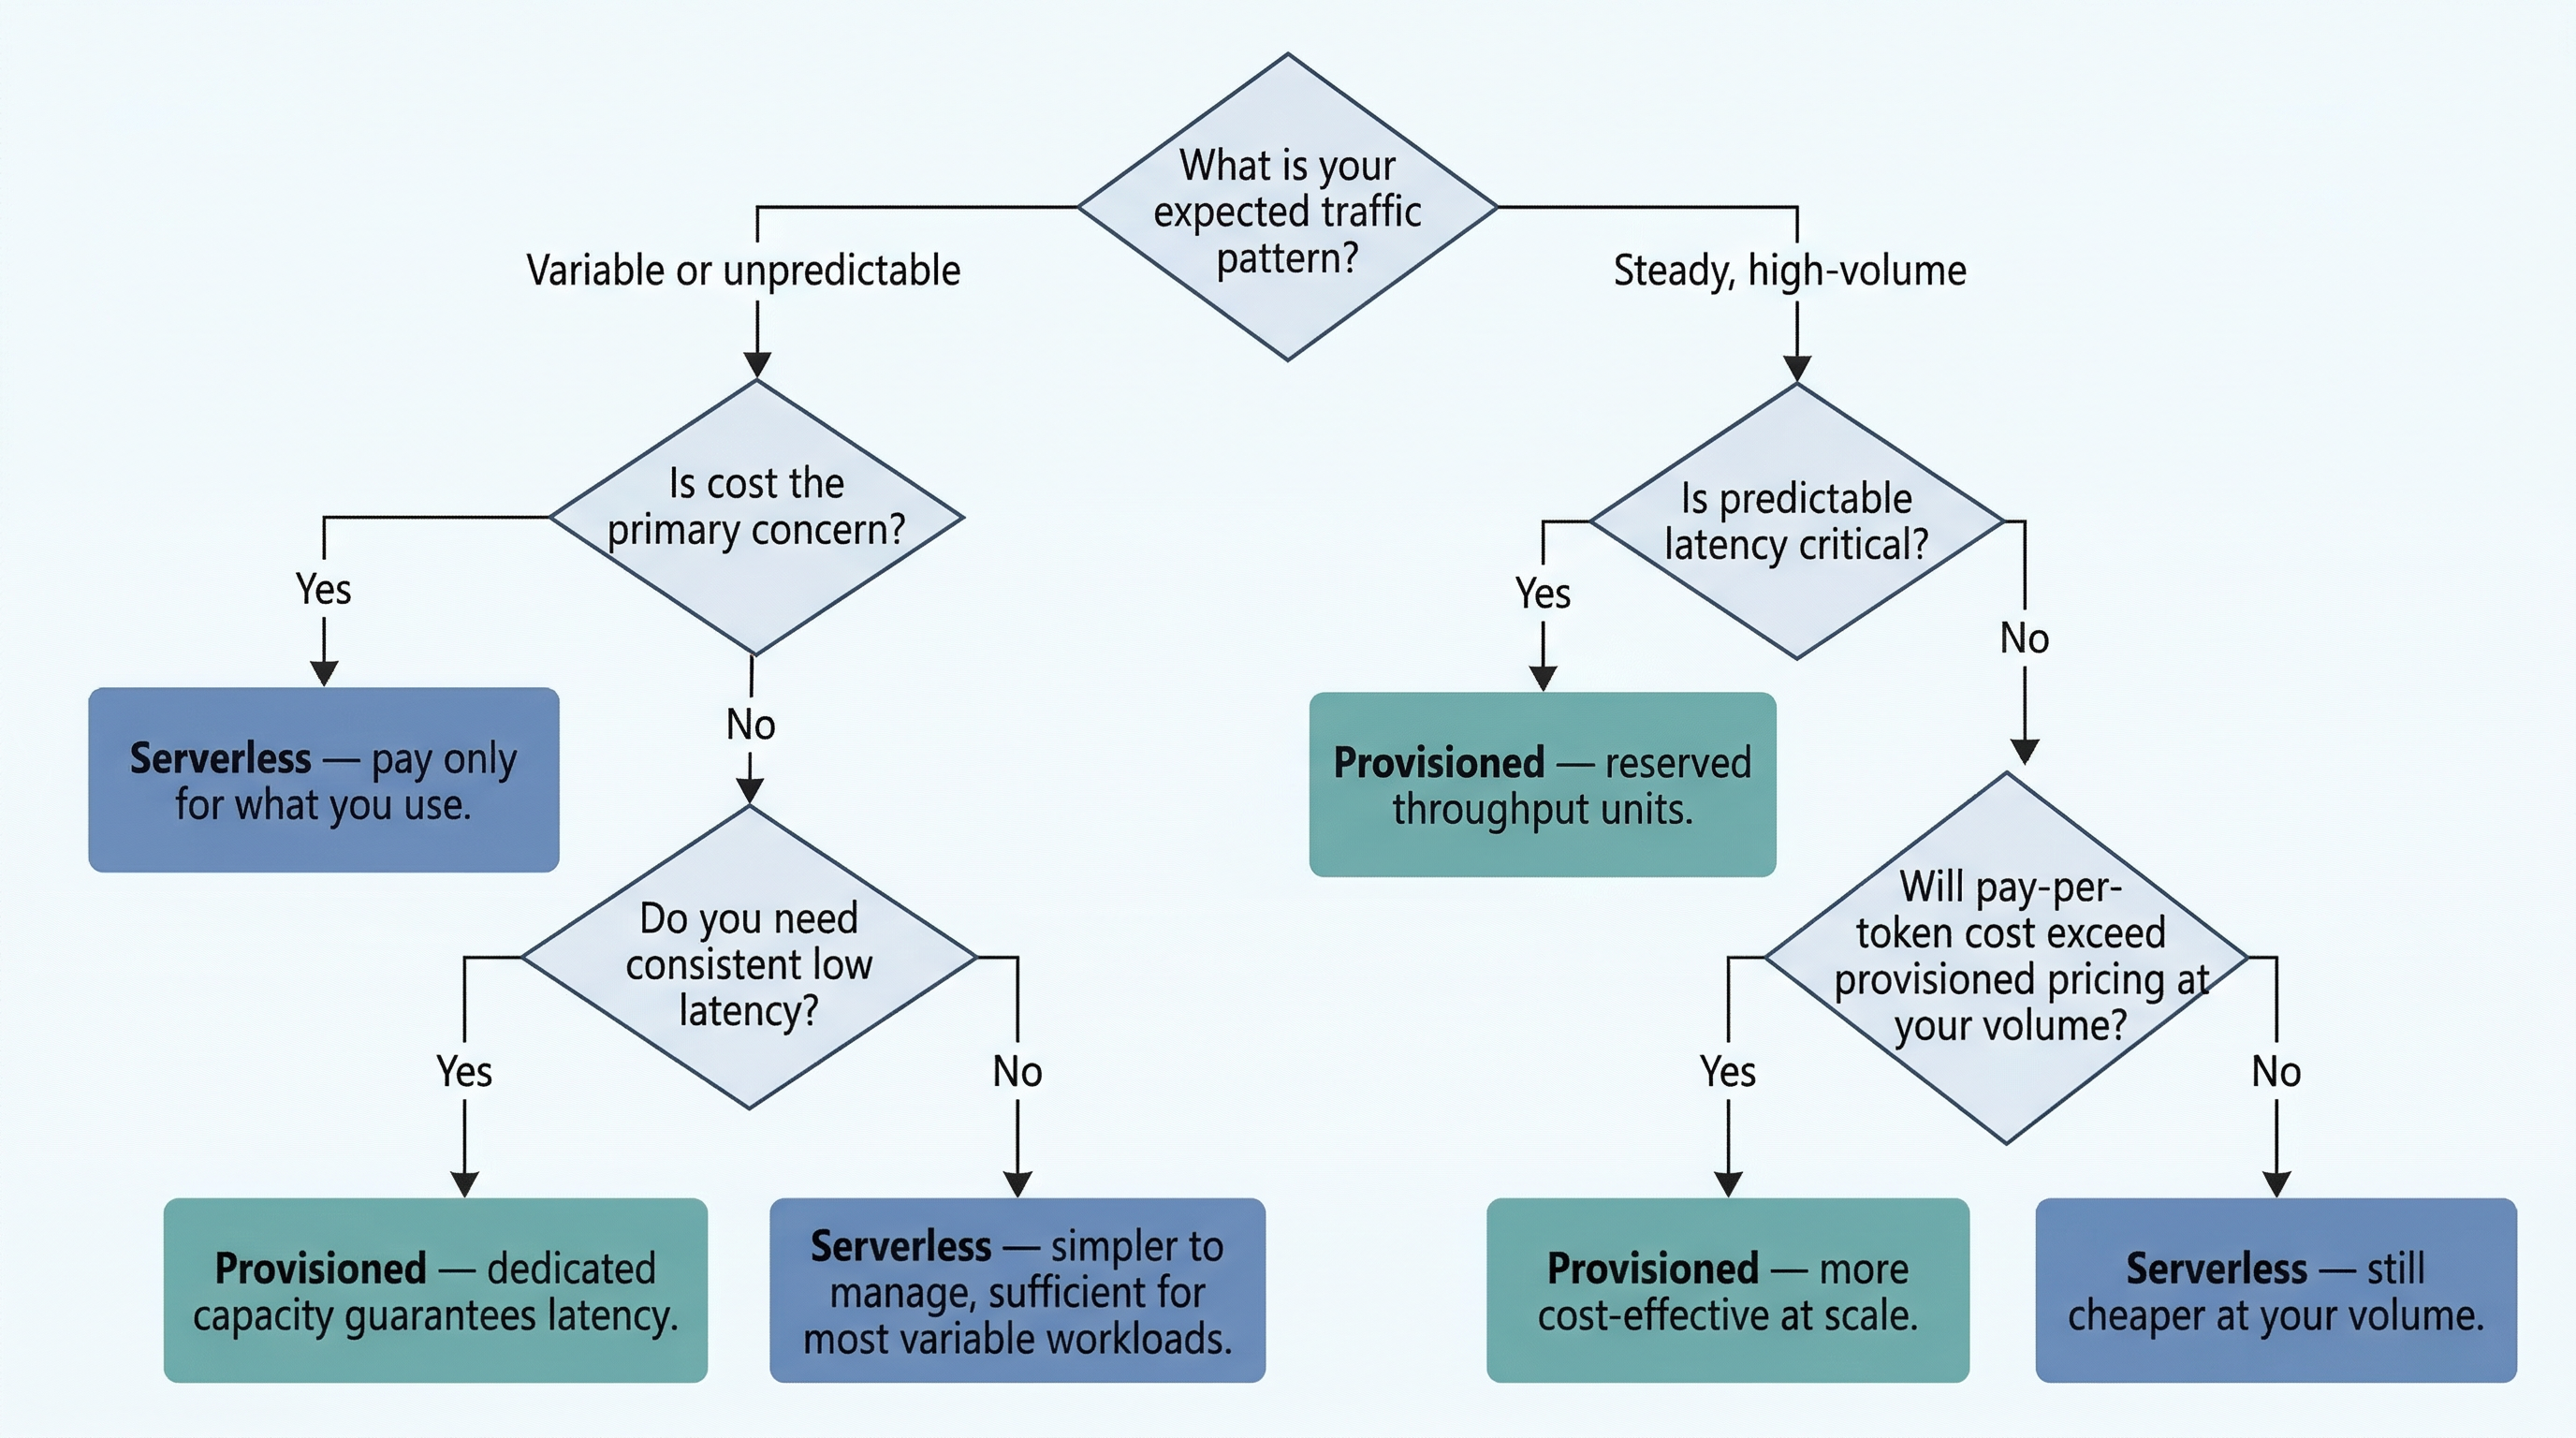
When choosing between deployment options, ask yourself four questions:
-
How predictable is my traffic? If traffic is steady and forecastable, provisioned deployment lets you right-size capacity. If traffic is spiky or unknown, serverless deployment avoids waste.
-
How sensitive is my application to latency? If your users expect sub-second responses and your SLA demands consistency, provisioned deployment provides the guarantees you need. If occasional slower responses are tolerable, serverless is simpler and cheaper.
-
What is my budget model? If your organization prefers operating expenses that scale with usage, pay-per-token serverless pricing aligns well. If your organization prefers predictable monthly costs, provisioned capacity with a fixed hourly rate is easier to budget.
-
Am I in production or prototyping? During early development, serverless deployment minimizes commitment and lets you experiment. When you move to production, provisioned deployment provides the reliability your users expect.
|
To estimate your token costs for a serverless deployment, count the average number of tokens in your prompts and completions, multiply by your expected request volume, and apply the per-token rate from the model card. A rough rule of thumb: one token is approximately four characters of English text, or about three-quarters of a word. A 500-word prompt is roughly 670 tokens. |
|
Not all models are available in all Azure regions, and not all models support both deployment options. Before committing to a model and deployment strategy, check the model card in the Microsoft Foundry catalog for regional availability and supported deployment types. Choosing a model that is not available in your target region will block your deployment. |
1.4 Configuring Chat Completion API Calls
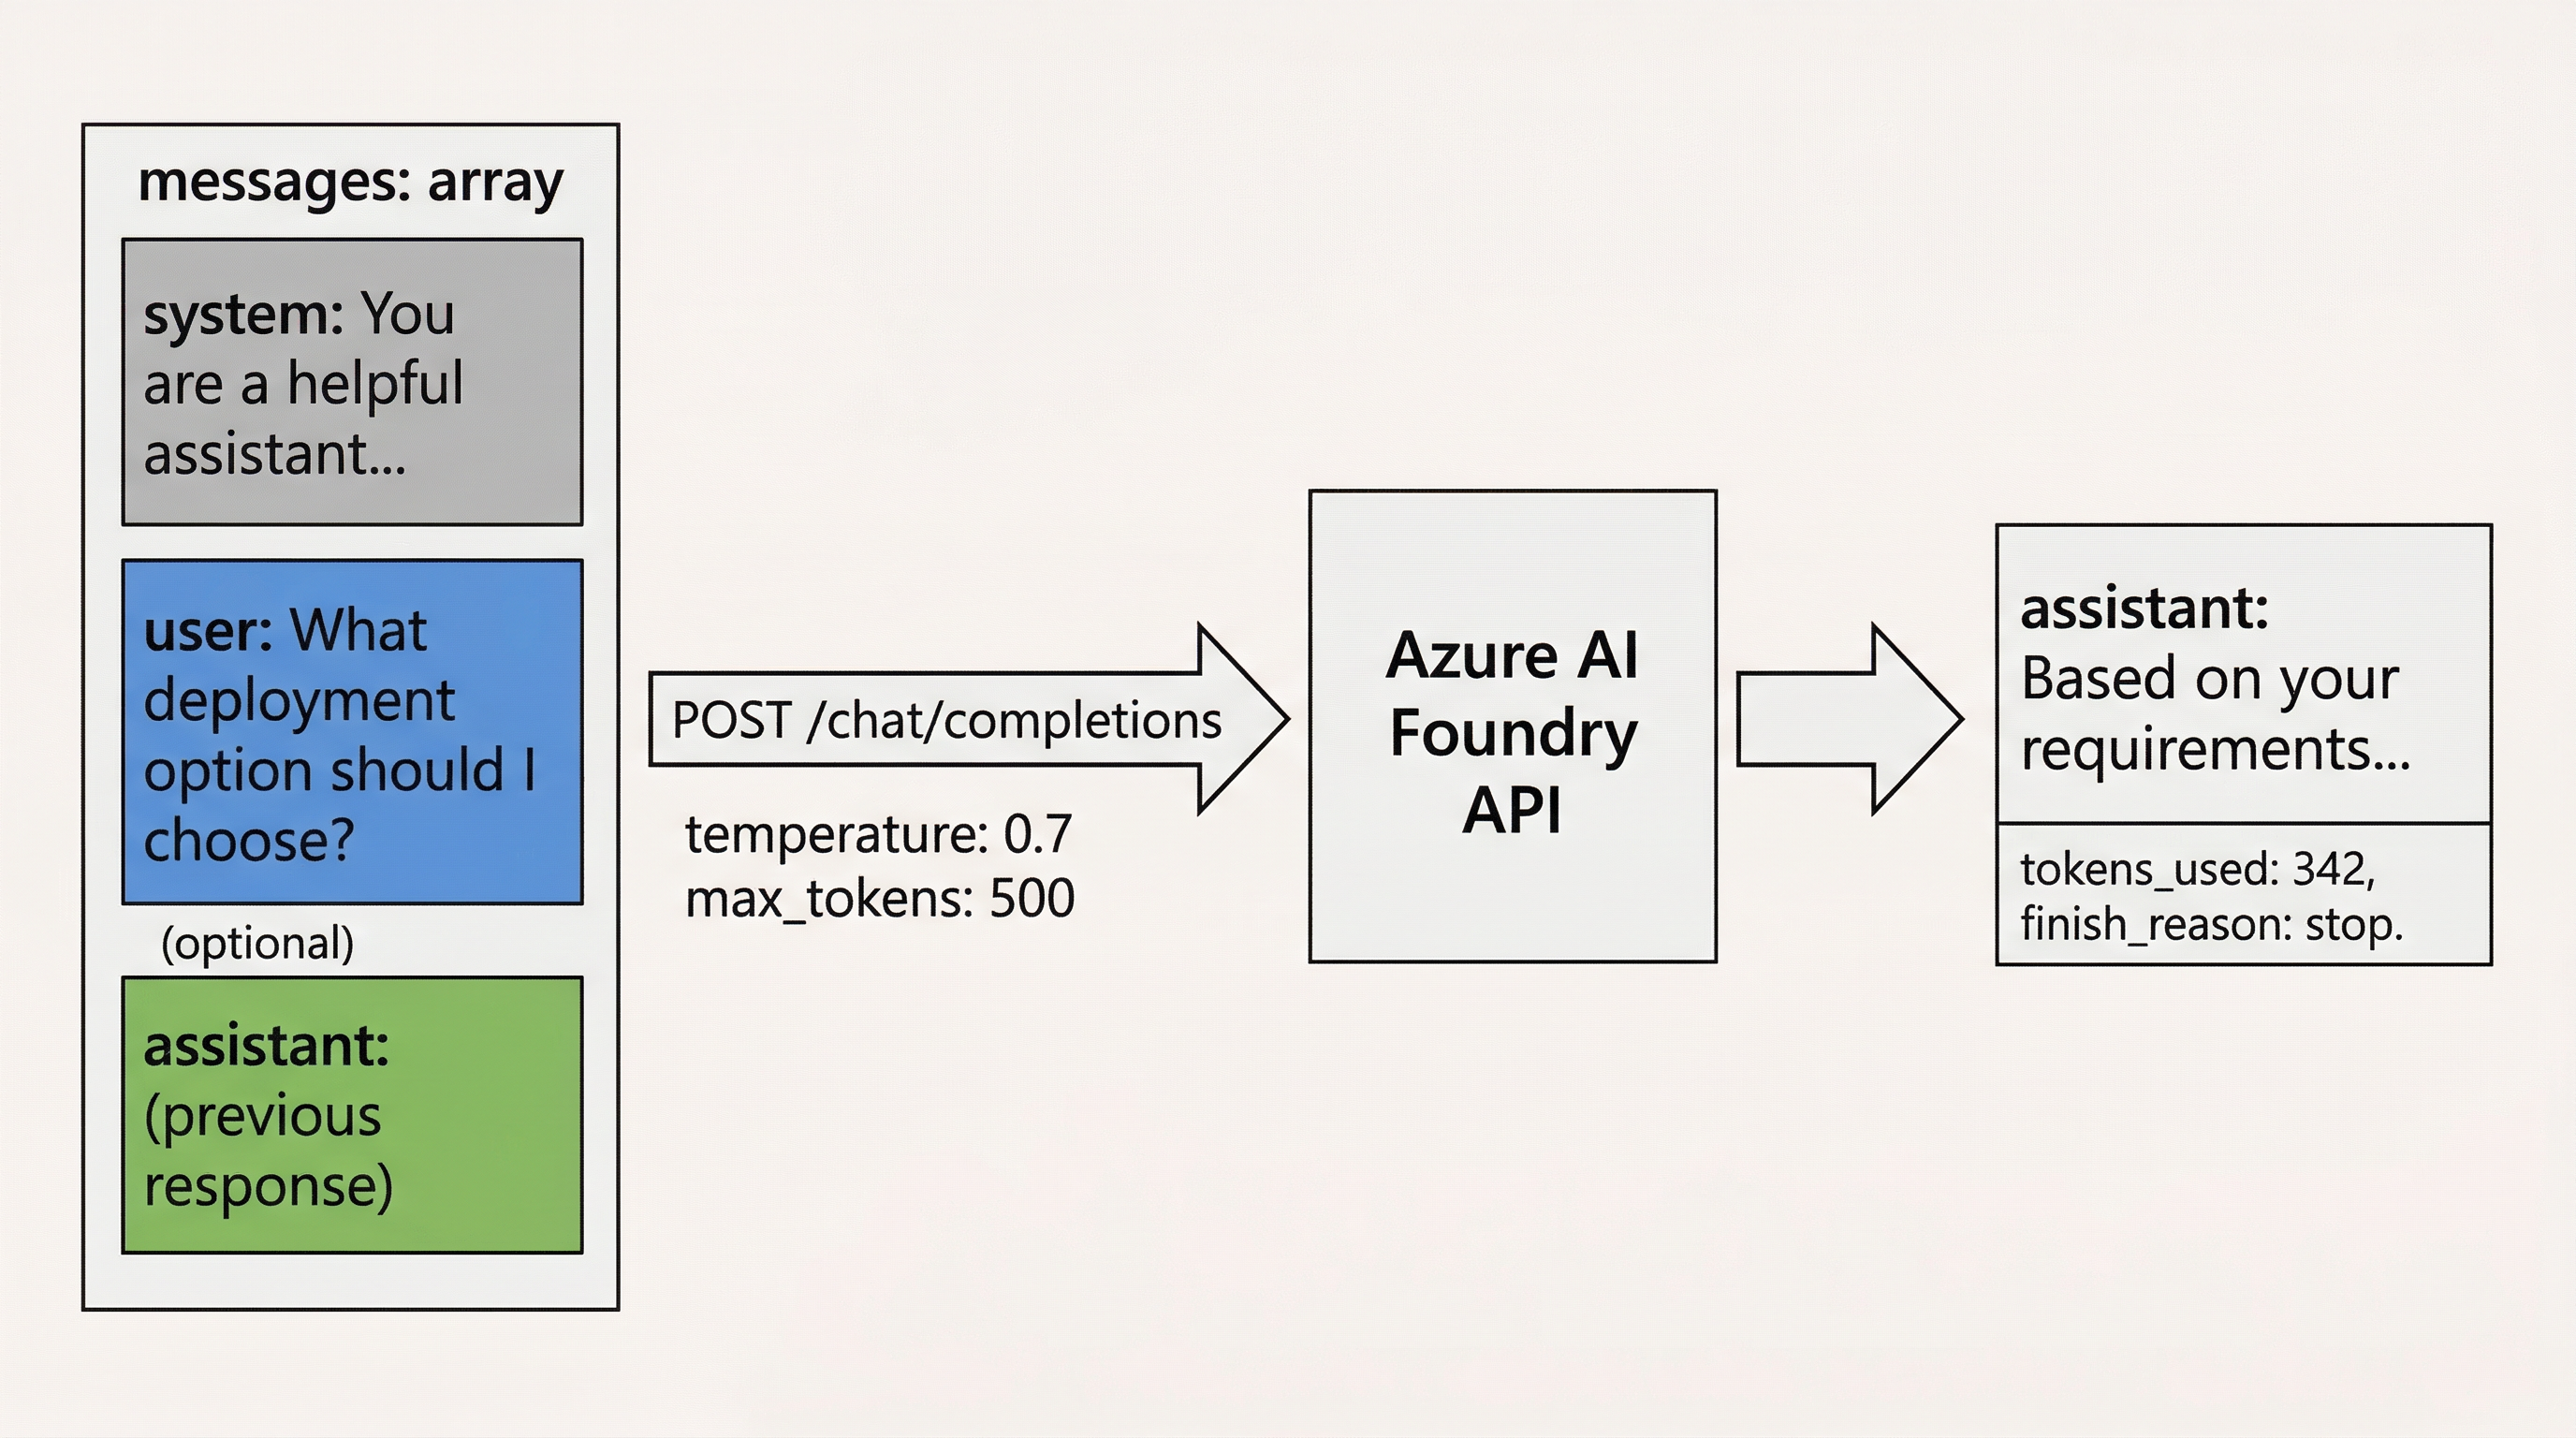
With a model deployed and an endpoint active, you are ready to send requests. The chat completion API is the primary interface for interacting with deployed language models. It accepts a structured conversation as input and returns a model-generated completion as output. Understanding the request structure and its configurable parameters is essential for getting the behavior you want from your model.
The Chat Completion Request Structure
A chat completion request is built around a list of messages, each with a designated role. There are three roles:
System message. The system message sets the model’s persona, behavioral guidelines, and constraints. It is the first message in the conversation and is not shown to the end user. Think of the system message as instructions you give to the model before it begins responding to users. For example: "You are a helpful customer service agent for an e-commerce company. Be concise, polite, and only provide information about orders, returns, and shipping."
User message. The user message contains the end user’s input — the question, instruction, or prompt they type into the chat interface.
Assistant message. The assistant message contains a previous response from the model. Including prior assistant messages in the request enables multi-turn conversations, because the model can see the history of the exchange.
Together, these messages form a conversation history that gives the model context for generating its next response. In a multi-turn chat application, your code accumulates user and assistant messages over the course of the conversation and includes them in each subsequent API call.
Key Parameters
Beyond the message list, the chat completion API accepts several parameters that control how the model generates its response. The four most important parameters are:
- temperature
-
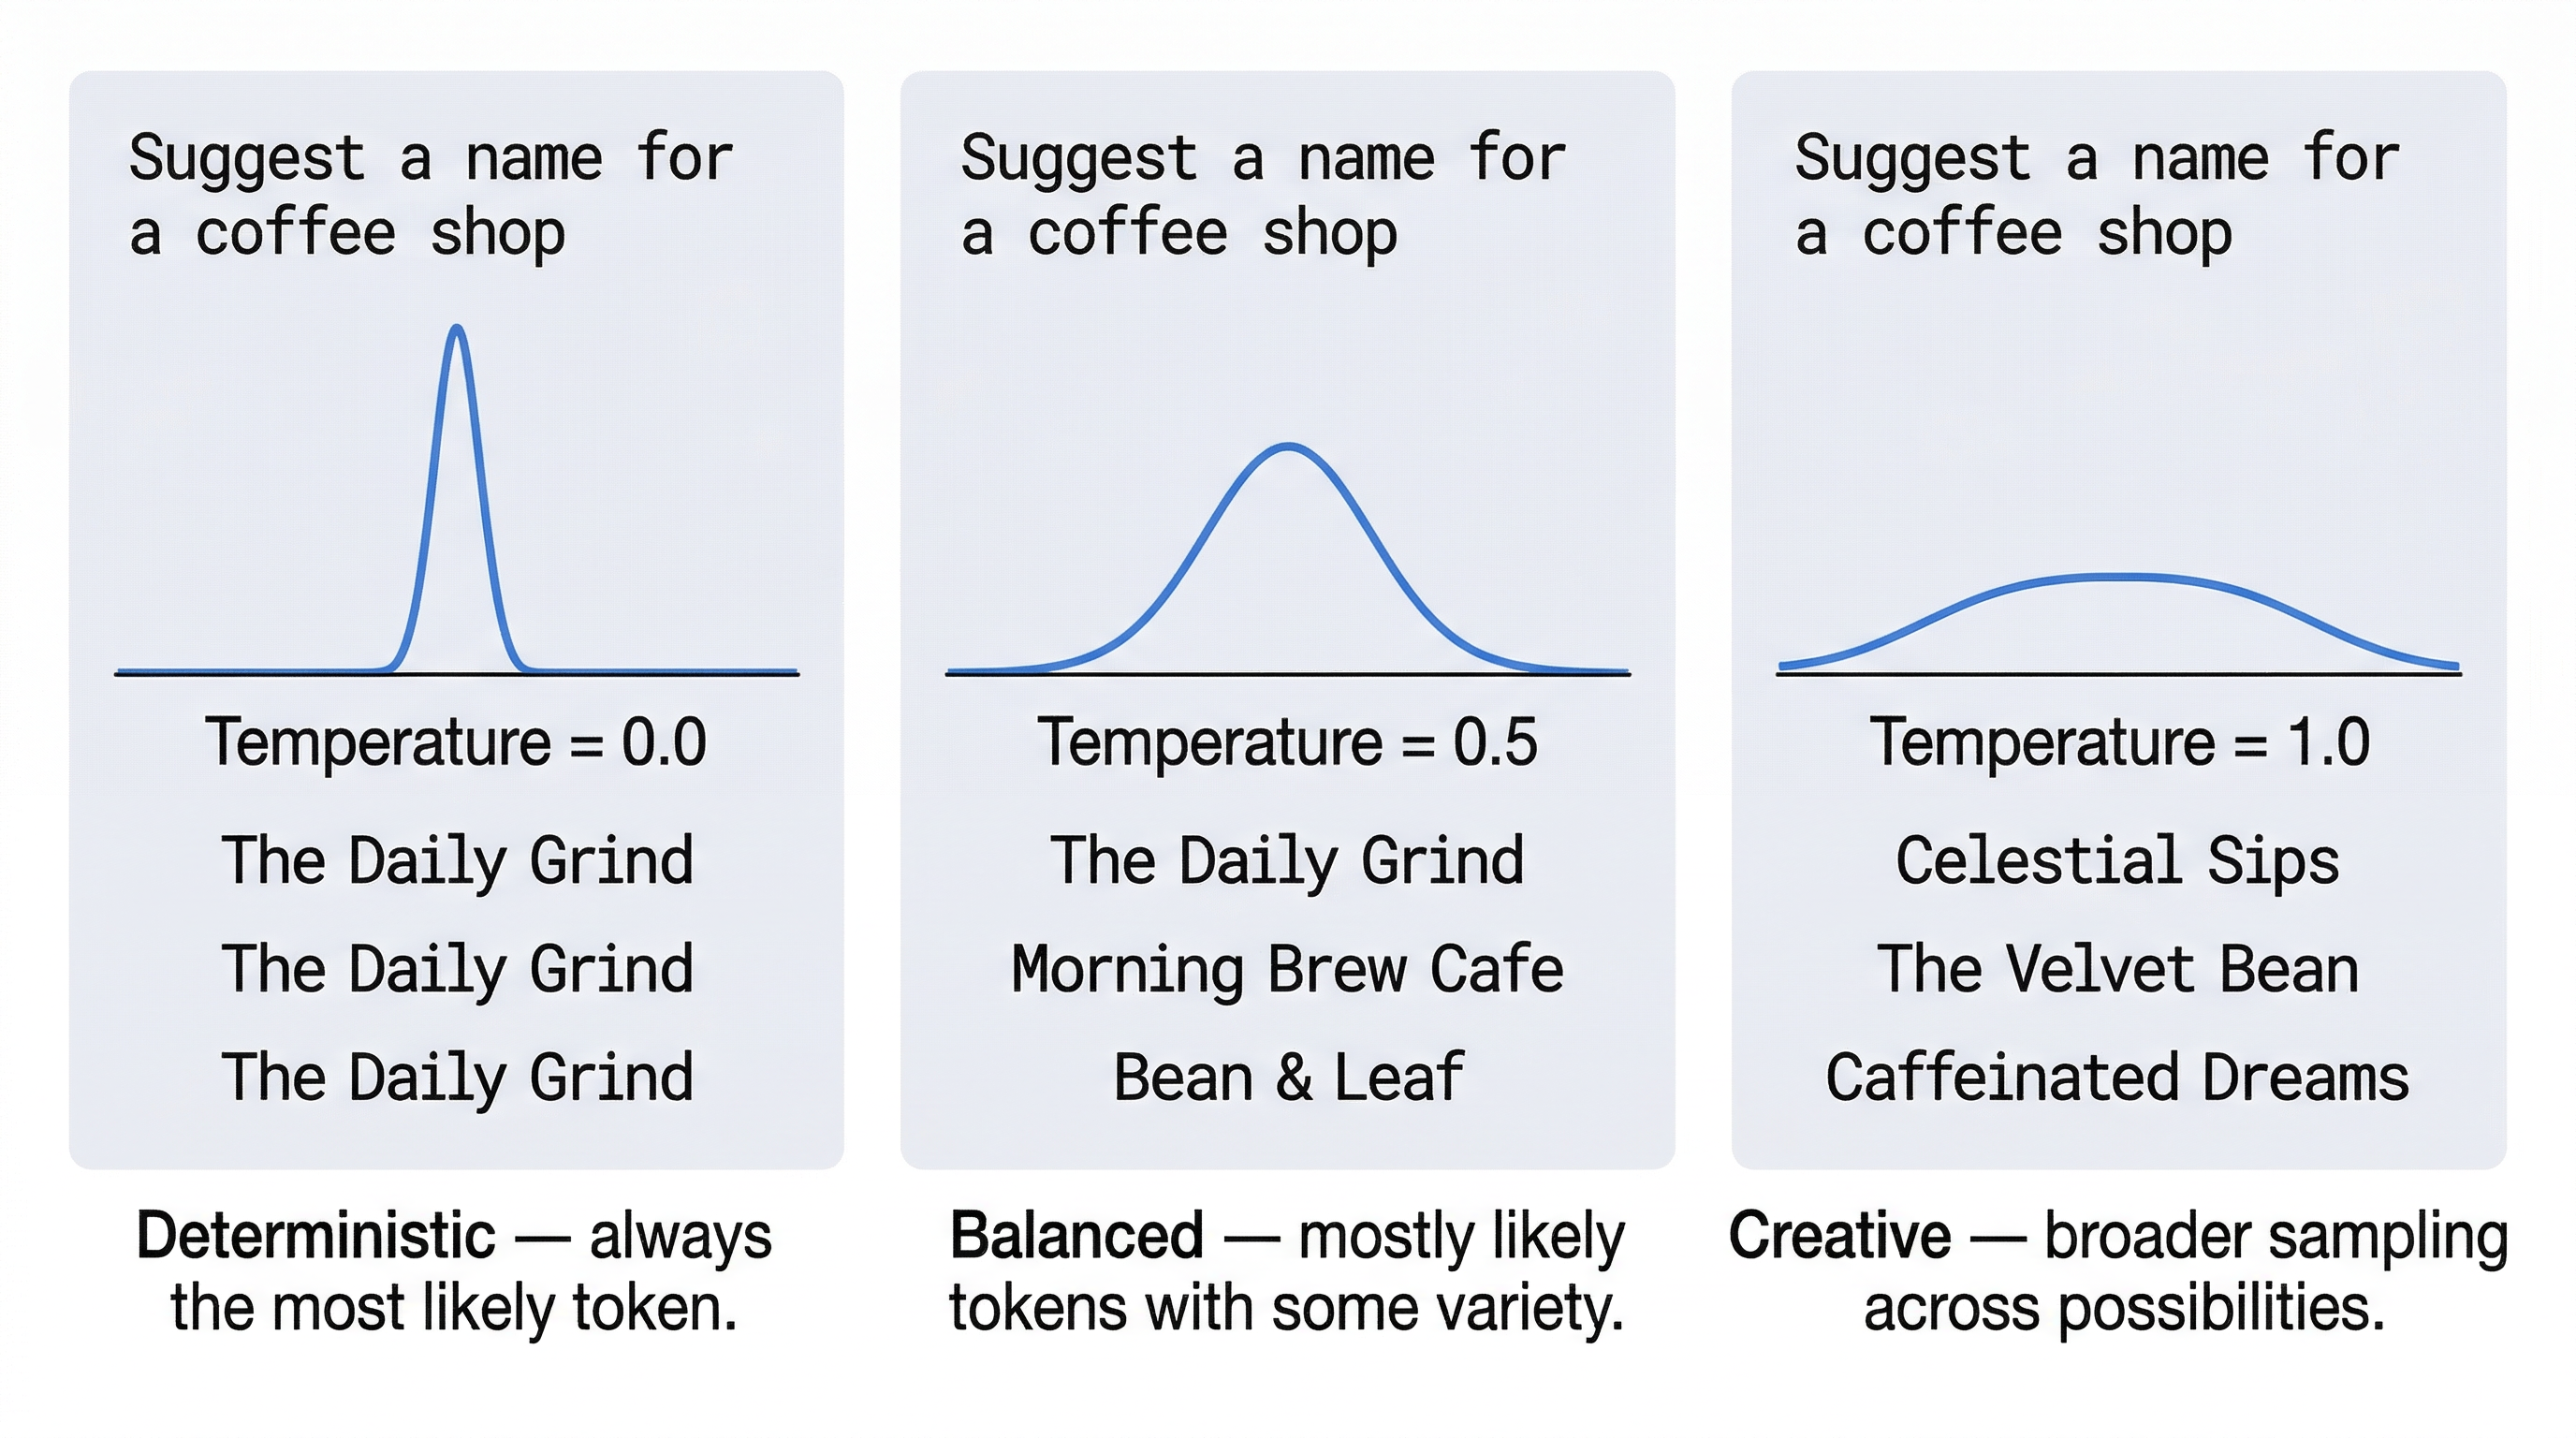
Controls the randomness of the model’s output. Values range from 0.0 to 2.0. A temperature of 0.0 makes the model nearly deterministic — it will almost always choose the most probable next token. Higher values introduce more randomness, producing more varied and creative responses. For factual tasks like answering support questions, a low temperature (0.0 to 0.3) is appropriate. For creative tasks like brainstorming or writing fiction, a higher temperature (0.7 to 1.0) gives better results.
- max_tokens
-
Sets the maximum number of tokens the model can generate in its response. This parameter acts as a ceiling — the model will stop generating once it reaches this limit, even if the response is incomplete. Setting max_tokens too low can result in truncated answers; setting it too high can increase cost and latency. Choose a value that accommodates your expected response length with some margin.
- top_p
-
An alternative to temperature for controlling randomness, using nucleus sampling. A top_p value of 0.1 means the model only considers the tokens that make up the top 10% of the probability mass. Lower values make output more focused; higher values allow more variety. In practice, you should adjust either temperature or top_p, but not both at the same time, as they interact in unpredictable ways.
- frequency_penalty
-
A value between -2.0 and 2.0 that penalizes the model for repeating tokens it has already used. Positive values discourage repetition, making the model more likely to introduce new vocabulary and ideas. A value of 0.0 applies no penalty. This parameter is useful when you notice the model producing repetitive or circular responses.
Crafting Effective System Messages
The system message is your most powerful tool for shaping model behavior without touching code. A well-crafted system message can:
-
Define the model’s role and expertise ("You are a technical support specialist for Azure cloud services.")
-
Set response format requirements ("Always respond with a numbered list of steps.")
-
Establish boundaries ("Do not provide medical, legal, or financial advice.")
-
Specify tone and style ("Use a professional but friendly tone. Keep responses under 150 words.")
When writing system messages, be specific and explicit. Vague instructions like "Be helpful" give the model little to work with. Concrete instructions like "Answer questions about our return policy. If the customer asks about something outside return policy, politely redirect them to the appropriate department" produce much more predictable behavior.
You will experiment with system messages in Lab 3 and observe how different instructions change the model’s responses to the same user prompts.
Parameter Tuning Effects
The interplay between parameters creates a wide range of possible output behaviors. Consider two extremes:
Configuration A: Factual and deterministic. Temperature 0.0, max_tokens 200, frequency_penalty 0.0. This configuration produces short, consistent, highly predictable responses. Run the same prompt ten times and you will get nearly identical output. This is ideal for FAQ bots, data extraction, and any task where consistency matters more than creativity.
Configuration B: Creative and exploratory. Temperature 0.9, max_tokens 800, frequency_penalty 0.5. This configuration produces longer, more varied, less repetitive responses. Run the same prompt ten times and you will get ten different outputs. This is better for brainstorming assistants, creative writing tools, and applications where novelty is a feature.
The following Python code demonstrates a complete chat completion API call with annotated parameters:
import os
from openai import AzureOpenAI

# Initialize the client with your endpoint and API key
client = AzureOpenAI(
    azure_endpoint=os.getenv("AZURE_OPENAI_ENDPOINT"),  (1)
    api_key=os.getenv("AZURE_OPENAI_API_KEY"),
    api_version="2024-06-01"
)

# Send a chat completion request
response = client.chat.completions.create(
    model="gpt-4o",  (2)
    messages=[
        {
            "role": "system",  (3)
            "content": (
                "You are a customer service agent for an online bookstore. "
                "Answer questions about orders, shipping, and returns. "
                "Be concise and polite. If a question is outside your scope, "
                "say: 'Let me connect you with a specialist.'"
            )
        },
        {
            "role": "user",  (4)
            "content": "I ordered a book three days ago and it still hasn't shipped. "
                       "Can you check the status?"
        }
    ],
    temperature=0.2,          (5)
    max_tokens=300,            (6)
    top_p=1.0,                 (7)
    frequency_penalty=0.0      (8)
)

# Extract and print the model's response
print(response.choices[0].message.content)| 1 | The endpoint URL from your Microsoft Foundry deployment. |
| 2 | The deployment name, which corresponds to the model you deployed. |
| 3 | The system message defines the assistant’s role and behavioral constraints. |
| 4 | The user message contains the customer’s inquiry. |
| 5 | Low temperature (0.2) for consistent, factual responses. |
| 6 | Up to 300 tokens in the response — sufficient for a concise answer. |
| 7 | top_p at 1.0 means no nucleus sampling restriction (temperature controls randomness here). |
| 8 | No frequency penalty — repetition is unlikely in short, factual responses. |
The example above uses an API key, which is fine for a quick local experiment. For production, the recommended approach is keyless authentication with managed identity, as introduced in Section 1.2. The change is small: you replace the api_key argument with a token provider built from DefaultAzureCredential, and you no longer store or transmit a secret.
import os
from openai import AzureOpenAI
from azure.identity import DefaultAzureCredential, get_bearer_token_provider  (1)

# DefaultAzureCredential discovers your identity automatically:
# your signed-in dev account locally, a managed identity in Azure.
token_provider = get_bearer_token_provider(  (2)
    DefaultAzureCredential(),
    "https://cognitiveservices.azure.com/.default"
)

client = AzureOpenAI(
    azure_endpoint=os.getenv("AZURE_OPENAI_ENDPOINT"),
    azure_ad_token_provider=token_provider,  (3)
    api_version="2024-06-01"
)
# The chat.completions.create(...) call is identical to the key-based version.| 1 | Import the credential and token-provider helpers from the azure-identity library. |
| 2 | Build a token provider scoped to the Foundry Tools (Cognitive Services) resource. Azure issues short-lived tokens automatically — there is no key to manage. |
| 3 | Pass azure_ad_token_provider instead of api_key. No secret is stored in code or environment variables. |
|
Keyless authentication requires that your identity be granted an appropriate role (such as Cognitive Services User) on the Foundry resource through Azure role-based access control. You set this up once at the project level; afterward, both local development and deployed applications authenticate without any secret in your code. This eliminates an entire class of security incidents caused by leaked keys. |
1.5 Model Selection and Its Downstream Effects
Choosing a model is not just a technical checkbox — it is a decision that cascades through your entire application. The model you select determines your cost per request, your response latency, the quality and depth of your outputs, and even which deployment options are available to you.
Model Families and Capability Tiers
The Microsoft Foundry model catalog organizes models into families and capability tiers. At a high level, you will encounter:
-
Large, highly capable models (such as GPT-4o and GPT-4.1) that excel at complex reasoning, nuanced language understanding, and multi-step tasks. These models are the most expensive per token and have the highest latency, but they deliver the best output quality for demanding tasks.
-
Smaller, efficient models (such as GPT-4o mini and GPT-4.1 mini) that offer good performance at a fraction of the cost. These models are faster and cheaper, making them suitable for high-volume, straightforward tasks like classification, summarization, or simple Q&A.
-
Open-source and third-party models (such as Meta Llama and Mistral) that provide additional options with varying cost-performance profiles. These models may offer advantages for specific tasks or use cases, and some can be fine-tuned for domain-specific applications.
The right tier depends on your task complexity. If your chatbot answers simple shipping questions, a smaller model handles it well at low cost. If your application needs to analyze complex contracts and produce detailed summaries, you need a larger, more capable model.
Context Window Sizes
Every model has a context window — the maximum number of tokens it can process in a single request, including both the input (system message, conversation history, user prompt) and the output (the model’s response). Context window sizes vary dramatically across models:
-
Some smaller models support 4,096 or 8,192 tokens.
-
Mid-tier models commonly offer 32,768 or 65,536 tokens.
-
The latest large models support 128,000 tokens or more.
The context window constrains what your application can do. If you are building a multi-turn chatbot, the conversation history grows with each exchange. Once the accumulated messages exceed the context window, you must either truncate older messages (losing context) or summarize them (adding complexity and potential information loss). Applications that need to process long documents — legal contracts, research papers, codebases — require models with larger context windows.
Context window size also affects cost. Larger context windows allow more input tokens per request, and you pay for every token sent. A request that fills a 128,000-token context window costs significantly more than one that uses 4,000 tokens of a smaller window.
Performance, Cost, and User Experience
Every model selection decision creates a three-way tension between performance, cost, and user experience:
-
Choosing a larger model improves output quality but increases cost and latency. Users get better answers but may wait longer for them.
-
Choosing a smaller model reduces cost and latency but may produce shallower or less accurate responses. Users get faster answers but may need to ask follow-up questions.
-
Choosing a model with a larger context window enables richer conversations but increases per-request cost. Users benefit from the model "remembering" more context, but your token bill grows.
There is no universally correct answer. The right model depends on your specific requirements — and those requirements may differ across features within the same application. A common pattern is to use a smaller, cheaper model for routine tasks (intent classification, simple FAQ) and route complex queries to a larger model. This tiered approach optimizes cost without sacrificing quality where it matters most.
Risk Mitigation
Model selection also introduces operational risks that responsible engineering practices can mitigate:
Model deprecation. Cloud providers periodically retire older model versions. If your application is tightly coupled to a specific model version, a deprecation notice forces an urgent migration. To mitigate this risk, abstract your model calls behind a configuration layer so you can switch models by changing a configuration value rather than rewriting code.
Versioning and reproducibility. Model behavior can change between versions. A prompt that produces excellent results with one model version may produce different results after an update. Pin your deployments to specific model versions and test thoroughly when upgrading.
Fallback strategies. If your primary model endpoint becomes unavailable — due to regional outages, quota exhaustion, or throttling — your application needs a plan. Common fallback strategies include deploying a secondary model in a different region, maintaining a serverless endpoint as a backup for a provisioned deployment, or implementing graceful degradation that informs users of temporary limitations rather than failing silently.
1.6 Comparing and Evaluating Models
Section 1.5 made the case that model selection has real consequences for cost, latency, and quality. But how do you actually decide which model is best for your task? Reading model cards tells you what each model claims to do; it does not tell you how a model performs on your specific prompts and data. Model evaluation closes that gap. Instead of guessing, you measure — and you let evidence, not marketing, drive the choice. This is exactly the work you do in Lab 2.
Side-by-Side Comparison in the Catalog
The Microsoft Foundry portal lets you compare candidate models directly. Starting from the model catalog, you can select two or more models and view their attributes side by side: provider, parameter count (where published), context window size, supported deployment types, regional availability, and published benchmark scores. This comparison view is the right first filter — it quickly eliminates models that are unavailable in your region, too small for your context needs, or priced outside your budget.
Benchmark scores published on model cards are useful but limited. A model that tops a general reasoning leaderboard may still underperform on your domain — summarizing insurance claims, answering questions about your product catalog, or extracting fields from your invoices. That is why catalog comparison is a starting point, not a final answer.
Running an Evaluation
To measure how models perform on your task, you run an evaluation in Foundry. The pattern is consistent regardless of the metric:
-
Assemble a test dataset. Collect a representative set of inputs — example prompts — and, where possible, the expected or "ground truth" outputs. Even a few dozen realistic examples produce far more reliable signal than informal spot-checking.
-
Select candidate models. Choose the two or three models that survived your catalog comparison.
-
Choose evaluation metrics. Decide what "good" means for your task (see below).
-
Run and compare. Foundry runs each model against the dataset and presents the results in a comparison view so you can read the tradeoffs at a glance.
Reading Evaluation Metrics
Evaluation output in Foundry generally falls into three buckets, and the best model is rarely the winner in all three:
-
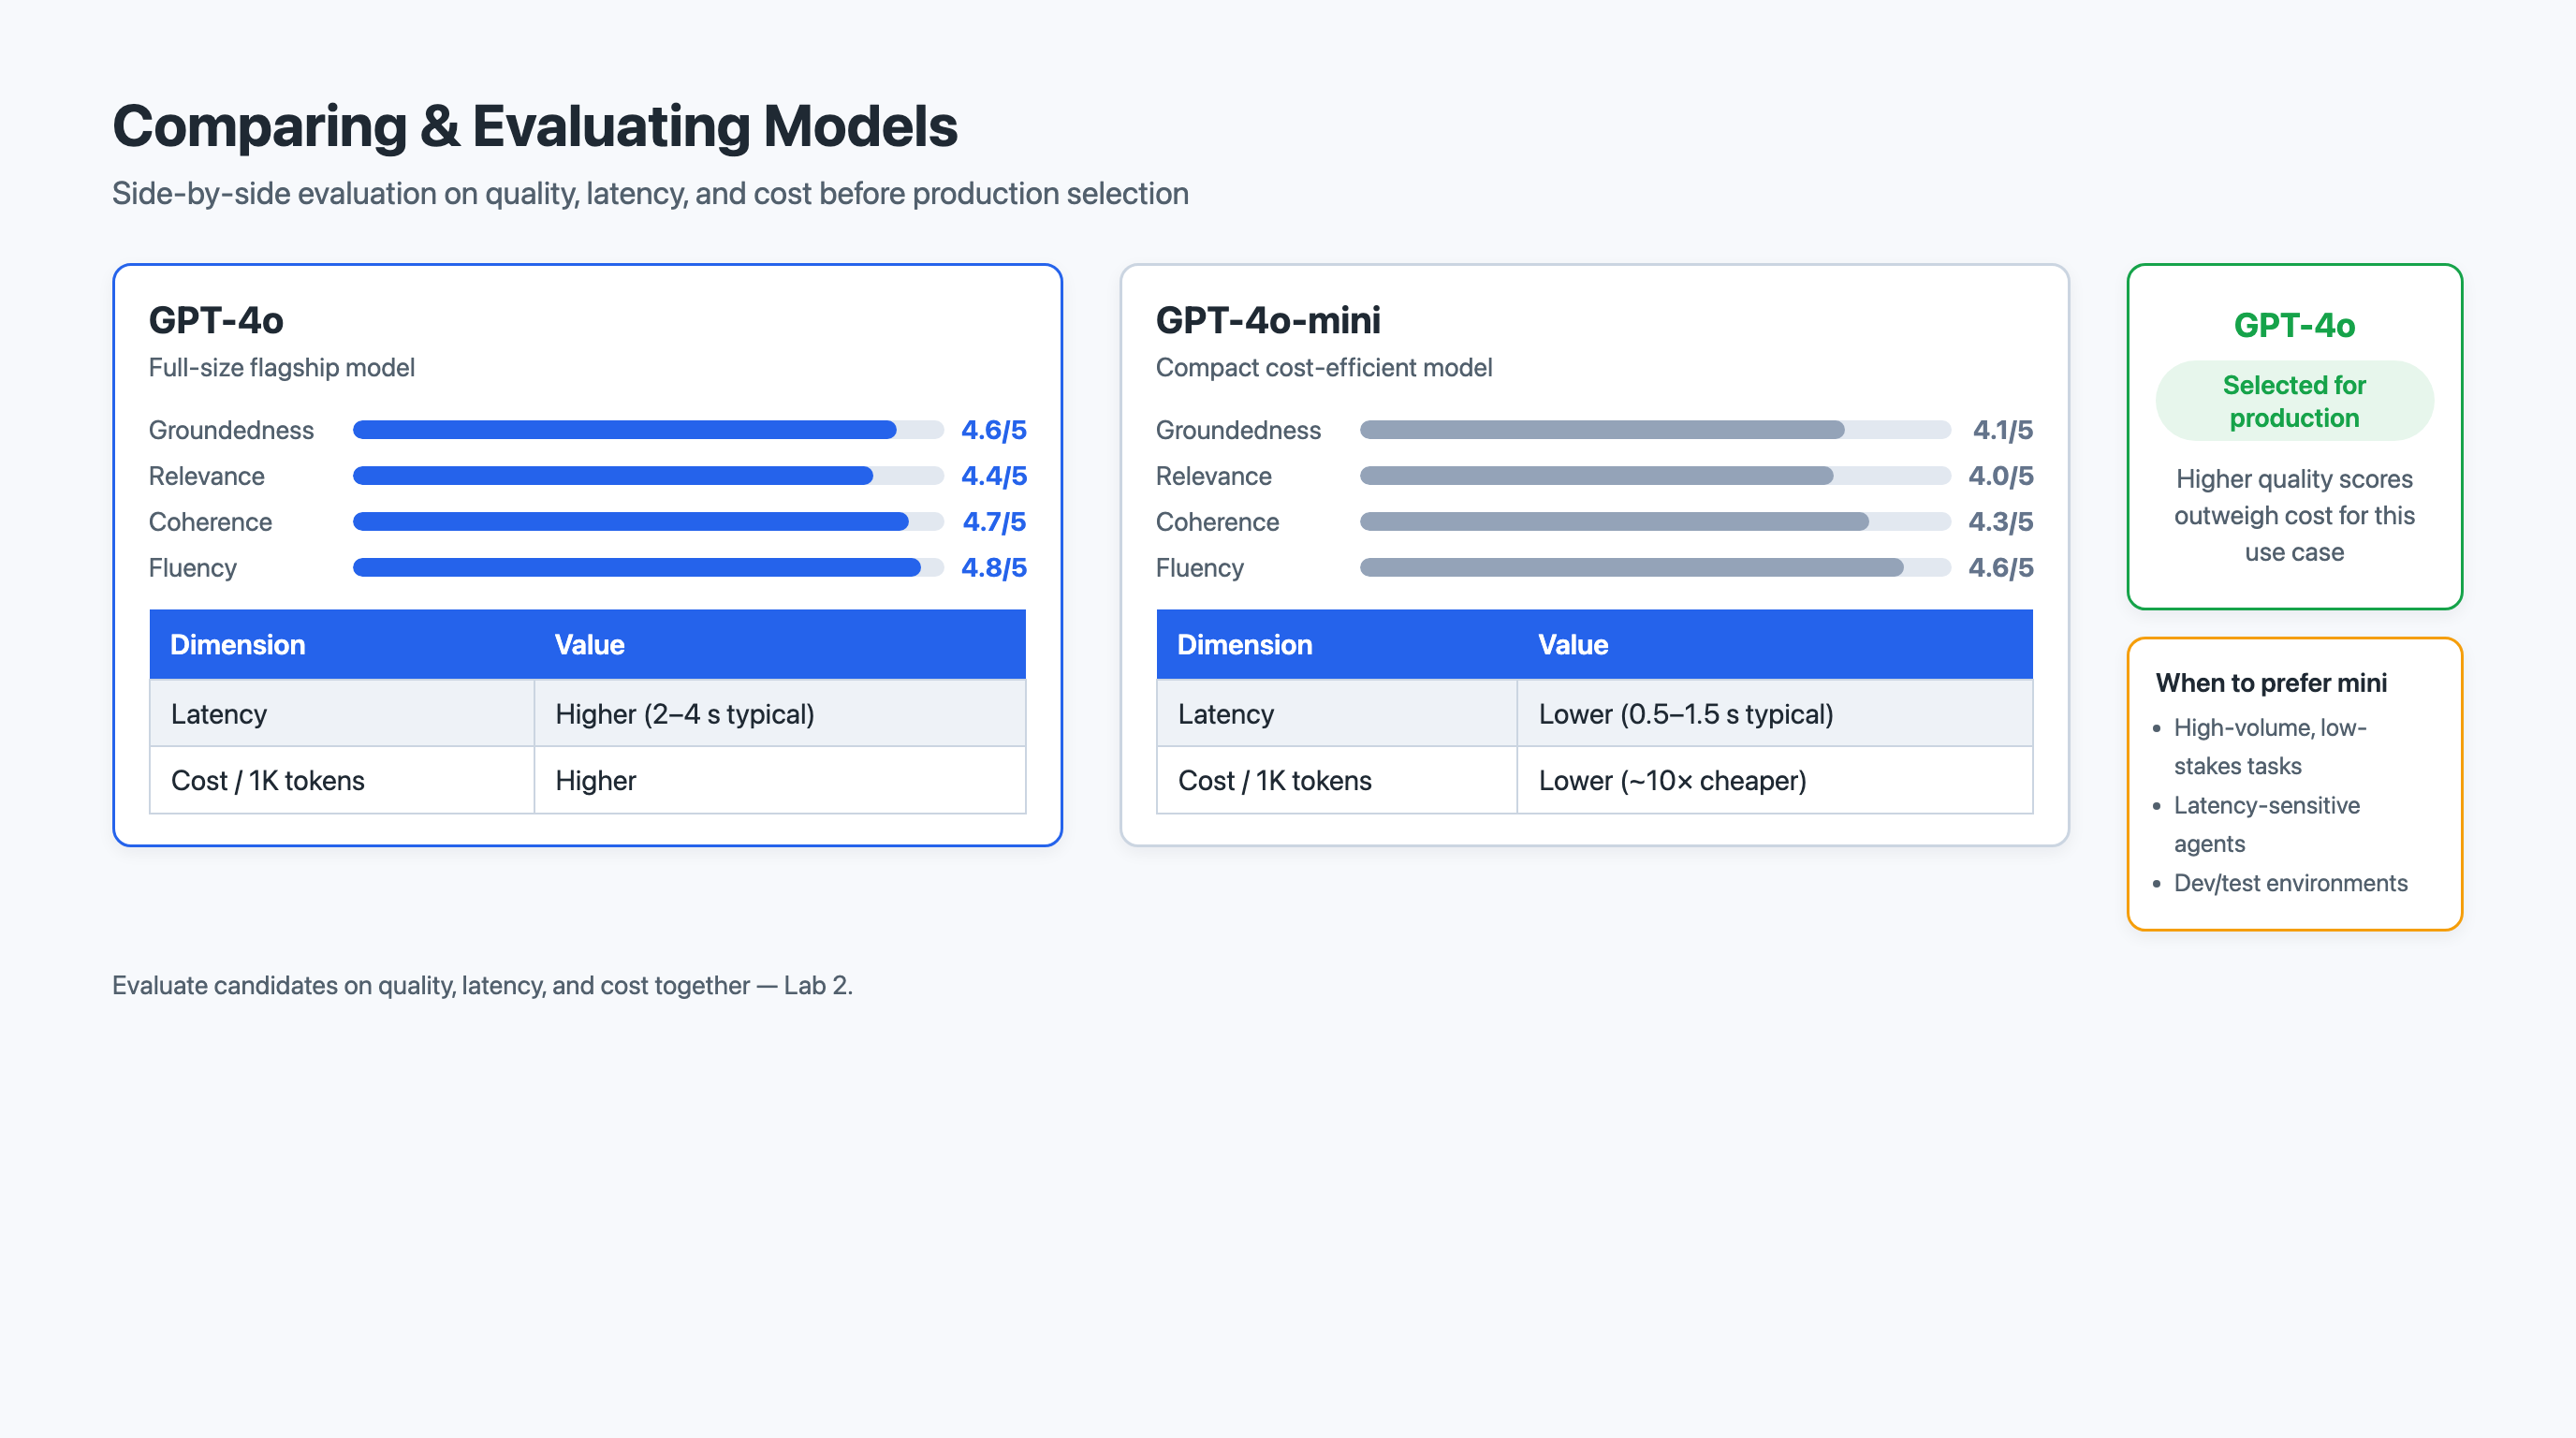
Quality. How good are the outputs? Quality can be measured automatically — for example, similarity to ground-truth answers, or scores from "AI-assisted" evaluators that judge relevance, coherence, and groundedness — and it can be assessed by human reviewers. Higher quality usually correlates with larger, more expensive models.
-
Latency. How long does the model take to respond? This is typically reported as average or percentile response time. Latency affects user experience directly: a model that is marginally more accurate but twice as slow may be the wrong choice for an interactive chatbot.
-
Cost. What does each request cost? Foundry reports token usage, which you translate into dollars using the model’s per-token rate. A high-quality model that costs ten times as much per request may not be justified if a cheaper model meets your quality bar.
The goal is not to find the single "best" model in the abstract — it is to find the model that best balances quality, latency, and cost for your requirements. A high-volume FAQ bot might rationally choose a fast, cheap model that scores slightly lower on quality, while a contract-analysis tool might accept higher cost and latency in exchange for top-tier accuracy. When you run your evaluation in Lab 2, capture the numbers for all three dimensions so you can defend your recommendation with evidence rather than intuition.
1.7 Hands-On Connections
The concepts in this chapter come to life across three hands-on lab activities. Here is what to watch for in each.
Lab 1: Prepare for an AI Development Project
In Lab 1, you will create a Microsoft Foundry project and set it up for secure development. As you work through the lab, pay attention to the following:
-
Region and resource choices. Notice how the region you select constrains which models are available and where your data is processed. Consider how a data-residency requirement would change your choice.
-
Keyless authentication. You will configure access using managed identity rather than copying an API key into your code. Observe how
DefaultAzureCredentiallets the same code authenticate locally and in Azure without a stored secret. -
Quota and cost visibility. Locate where the portal reports quotas and projected cost. These are the guardrails you will rely on as your project grows.
Lab 2: Explore Models and Evaluate Performance
In Lab 2, you will compare candidate models and run an evaluation. This is where the ideas in Section 1.6 become concrete:
-
Side-by-side comparison. Use the catalog comparison view to filter candidates by context window, deployment support, and regional availability before you evaluate.
-
Evaluation metrics. Run an evaluation against a test dataset and read the quality, latency, and cost results. Notice which model "wins" on each dimension — and that no single model usually wins on all three.
-
Justifying a choice. Record the numbers. The evidence you gather here is exactly what a solutions architect uses to defend a model recommendation.
Lab 3: Create a Generative AI Chat App
In Lab 3, you will build a chat application that calls the chat completion API. This is where parameter tuning becomes tangible:
-
System message impact. Experiment with different system messages and observe how they change the model’s behavior. Try giving the model a specific persona and then removing the system message entirely — the difference is often dramatic.
-
Temperature effects. Run the same prompt at temperature 0.0 and again at 0.8 or higher. Compare the responses for consistency, creativity, and accuracy.
-
max_tokens behavior. Set max_tokens to a very low value (like 50) and observe how the model truncates its response. Then increase it and notice the difference in response completeness and cost implications.
-
Secure access. Authenticate the app using the keyless pattern you set up in Lab 1, confirming that no API key is stored in your code.
Document your observations carefully. Your screenshots and notes from these labs provide the evidence you will need for the discussion post and weekly reflection.
1.8 Assessment Preparation
This week’s discussion post asks you to step into the role of a solutions architect advising a company on deploying a generative AI feature. To prepare effectively, consider the following.
Understand the scenario. The discussion prompt describes a company with specific traffic patterns, performance requirements, and budget constraints. Before you write, re-read the scenario carefully and identify the key requirements. What does the company need most — low cost, low latency, high accuracy, or some combination?
Build your argument. Your post asks you to recommend a deployment option and a model size category. The strongest posts will not simply state a choice but will explain why that choice fits the scenario. Connect your recommendation to specific factors: How does the pricing model align with the company’s traffic pattern? How does the deployment option address their latency requirements?
Use evidence from the chapter and labs. The rubric rewards integration of concepts from readings and labs. Reference specific details — throughput unit behavior, token pricing models, evaluation metrics you recorded, parameter configurations you tested — rather than making general statements. If you observed something relevant during Lab 1, Lab 2, or Lab 3, cite that experience.
Identify a genuine risk. The discussion prompt asks you to identify one risk and a mitigation strategy. Think beyond the obvious. Consider what happens if traffic grows beyond projections, if the chosen model is deprecated, or if the deployment option you recommended does not perform as expected under edge conditions.
Structure your post clearly. A well-organized post with clear paragraphs, one point per paragraph, is easier for your classmates to engage with — and engagement quality affects your peer reply score.
1.9 Key Terms
- serverless deployment
-
A deployment model in which the cloud provider manages all infrastructure automatically. You pay only for the tokens consumed, with no reserved capacity. Ideal for variable or unpredictable workloads.
- provisioned deployment
-
A deployment model in which you reserve dedicated compute capacity using throughput units. Provides consistent latency and performance at a fixed hourly cost, regardless of actual usage.
- throughput unit
-
A unit of reserved compute capacity in a provisioned deployment, measured in tokens per minute. You select the number of throughput units based on your expected workload.
- token
-
The basic unit of text processing for a language model. A token is roughly four characters of English text or about three-quarters of a word. Both input and output are measured in tokens for billing and context window purposes.
- chat completion
-
The API operation in which a language model receives a structured conversation (a list of messages) and generates a response. The primary interface for interacting with deployed models.
- system message
-
The first message in a chat completion request, which defines the model’s persona, behavioral constraints, and response guidelines. Not visible to the end user.
- temperature
-
A parameter (0.0 to 2.0) that controls the randomness of model output. Lower values produce more deterministic, consistent responses; higher values produce more varied, creative responses.
- max_tokens
-
A parameter that sets the maximum number of tokens the model can generate in a single response. Acts as a ceiling to control response length and cost.
- top_p
-
A parameter that implements nucleus sampling by restricting the model to consider only the most probable tokens whose cumulative probability reaches the specified threshold. An alternative to temperature for controlling output randomness.
- frequency_penalty
-
A parameter (-2.0 to 2.0) that penalizes the model for reusing tokens it has already generated. Positive values discourage repetition and encourage diverse vocabulary.
- context window
-
The maximum number of tokens a model can process in a single request, including both input and output. Determines how much conversation history or document content the model can consider.
- model catalog
-
A searchable directory within Microsoft Foundry that lists available language models from multiple providers, with model cards showing capabilities, pricing, and regional availability.
- managed identity
-
An Azure identity, managed by the platform, that an application uses to authenticate to Azure resources without storing any credentials. Access is granted through role-based access control (RBAC), and the platform issues and rotates tokens automatically.
- keyless authentication
-
An authentication approach that uses a managed identity and short-lived, automatically issued tokens instead of a static API key. Eliminates the need to store, transmit, or rotate a long-lived secret, and is the recommended approach for production workloads.
- model evaluation
-
The process of measuring how candidate models perform on a representative test dataset, comparing them across quality, latency, and cost so that a model choice can be justified with evidence rather than intuition.
- latency
-
The time elapsed between sending a request to a model endpoint and receiving the response. Affected by model size, deployment type, network conditions, and request complexity.
- inference
-
The process of generating output from a trained model given an input. In the context of language models, inference is the act of producing a completion from a prompt.
- API endpoint
-
A URL that serves as the access point for your deployed model. Your application sends HTTP requests to this endpoint to invoke the chat completion API and receive responses.
1.10 Chapter Summary
This chapter established the foundational concepts you need to plan, deploy, configure, and evaluate language models in Microsoft Foundry. You learned that the Microsoft Foundry platform provides a model catalog for discovery, deployment tools for getting models into production, and monitoring capabilities for tracking performance. You saw how to prepare a Foundry project — choosing a region and resource — and why keyless authentication with managed identity is the recommended, secure alternative to long-lived API keys, along with the roles that quotas, cost, and monitoring play in planning a project responsibly.
You examined two deployment options — serverless (pay-per-token, auto-scaling, variable latency) and provisioned (reserved throughput units, predictable latency, fixed cost) — and developed a framework for choosing between them based on traffic patterns, latency requirements, and budget models. You explored the chat completion API in detail, learning how system messages, user messages, and assistant messages form a structured conversation, and how parameters like temperature, max_tokens, top_p, and frequency_penalty shape the model’s output — in both key-based and keyless authentication patterns.
Finally, you moved from intuition to evidence: you learned how to compare candidate models side by side in the catalog and run a model evaluation that measures quality, latency, and cost on your own test data, so you can defend a model choice rather than guess at one. You also considered how model selection decisions — the choice of model family, capability tier, and context window size — ripple through application performance, cost, and user experience.
These concepts form the platform on which the rest of the course builds. In Chapter 2, "Grounding with RAG & Responsible AI," you will extend your deployed models with Retrieval-Augmented Generation (RAG) to ground responses in your own data, and you will configure content safety filters to ensure that your AI applications behave responsibly.